Thunderous Cave
“ | Hollowed out over time by the everlasting rain on the island, this cave runs below the entirety of Donar Island. | ” |
~ Area Description |
Thunderous Cave is a dungeon area located on Donar Island, full of Electric Type Coromon. Deeper areas of the cave become dark enough that it limits the player's visibility of the map and causes encounters to start off with the Twilight weather condition. Visibility in these areas can be increased by wearing the Worker Helm or activating the trait Bright Light.
Description
Thunderous cave has 4 floors, divided into 7 areas in total. Several trainers and items can be found here.
Checkpoint: | Fuse Room |
---|
BF1
A small area underneath the first floor of the cave can be accessed through a ladder on F0. It is shrouded in darkness and is the only spot in the demo version of the game where Lunarpup can be encountered.
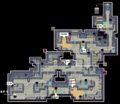
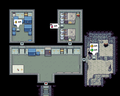
F0
The starting floor of the cave that has a ladder on the right side leading to BF1 and the left side has a ladder leading to F1. It contains two Coromon spawning zones, South (A) and North (B).
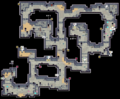
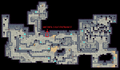
F1
The second floor of Thunderous Cave. It has rock puzzles and contains several chests and hidden items. It's the only spot in the demo version of the game where Gauslime can be encountered.
F1 - Hidden cave 1
The second floor of Thuderous Cave actually hides a secret cave in which are present several items and gems (requires TREMOR module).
F1 - Hidden cave 2
The Hidden Cave conceal a second Hidden Cave!? Is that a CAVE-CEPTION!? Looking for gems and items, engulfed by darkness (requires TREMOR module).
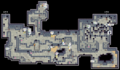
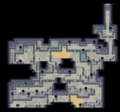
F2
The third floor of Thunderous Cave leading to the Fuse Room. It contains two Coromon spawning zones, South (A) and North (B).
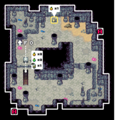
Fuse Room
This area is at the end of the cave. Where Thomas is stuck. the player has to overcharge the Fusebox with their Coromon to save him and gain access to the ladder on the right which will lead back to the first floor near the entrance.
Music Theme
This theme plays when the player is inside Thunderous Cave, the sound of of dripping water is also heard while it is playing. (For Mobile Users, click here)
Coromon Located Here
Coromon | Level | Rarity | Area | Double Battle | Triple Battle |
---|---|---|---|---|---|
Lumon | 7-12 | Common | BF1 - F0 - F1 - F2*A | F2*A | ❌ |
Buzzlet | 7-13 | Common | BF1 - F0 - F2*B | ❌ | ❌ |
Houndos | 7-13 | Common | BF1 - F1 - F2 | F2 | ❌ |
Moffel | 7-12 | Common | F0 - F1 - F2 | F0*B - F2 | ❌ |
Armado | 7-12 | Common | F0 - F1 | ❌ | ❌ |
Lunarpup | 6-12 | Common | BF1 | ❌ | ❌ |
Gauslime | 7-11 | Uncommon | F1 | ❌ | ❌ |
Acie | 8-13 | Uncommon | F2 | ❌ | ❌ |
Mooby | 8-12 | Rare | F2 | ❌ | ❌ |
Lumasect | 39-45 | Common | F1*HC*1 - F1*HC*2 | ❌ | ❌ |
Hountrion | 37-50 | Uncommon | F1*HC*1 - F1*HC*2 | ❌ | ❌ |
Dugterra | 37-45 | Common | F1*HC*1 - F1*HC*2 | ❌ | ❌ |
Armadon | 38-45 | Common | F1*HC*1 - F1*HC*2 | ❌ | ❌ |
Magnamire | 40-43 | Uncommon | F1*HC*1 | ❌ | ❌ |
Eclyptor | 40-45 | Common | F1*HC*2 | ❌ | ❌ |
Encounter Rates
Zone | Rates | ||||||||||||||||||
---|---|---|---|---|---|---|---|---|---|---|---|---|---|---|---|---|---|---|---|
Cave BF1 | 16.00% Buzzlet |
16.00% Houndos |
34.00% Lumon |
34.00% Lunarpup |
|||||||||||||||
Cave F0*A | 33.33% Buzzlet |
16.67% Moffel |
16.67% Armado |
33.33% Lumon |
|||||||||||||||
Cave F0*B | 16.00% Buzzlet |
34.00% Moffel Moffel |
16.00% Armado |
34.00% Lumon |
|||||||||||||||
Cave F1 | 16.67% Moffel |
16.67% Armado |
33.33% Houndos |
16.67% Lumon |
16.67% Gauslime |
||||||||||||||
Cave F2*A | 16.00% Moffel Moffel |
36.00% Houndos |
16.00% Lumon Lumon |
16.00% Acie |
16.00% Mooby |
||||||||||||||
Cave F2*B | 36.00% Buzzlet |
16.00% Moffel Moffel |
16.00% Houndos Houndos |
16.00% Acie |
16.00% Mooby |
||||||||||||||
Hidden cave F1*HC*1 | 20.00% Lumasect |
20.00% Hountrion |
20.00% Dugterra |
20.00% Armadon |
20.00% Magnamire |
||||||||||||||
Hidden cave F1*HC*2 | 20.00% Lumasect |
20.00% Hountrion |
20.00% Dugterra |
20.00% Armadon |
20.00% Eclyptor |
Rates for fruits held during battles
Zone | Rates for fruits held during battles | ||||||||||||||||||
---|---|---|---|---|---|---|---|---|---|---|---|---|---|---|---|---|---|---|---|
Cave BF1 | 0.00% Buzzlet |
6.25% Houndos |
2.94% Lumon |
0.00% Lunarpup |
|||||||||||||||
Cave F0*A | 4.00% Buzzlet |
0.00% Moffel |
4.00% Armado |
2.00% Lumon |
|||||||||||||||
Cave F0*B | 0.00% Buzzlet |
0.00% Moffel Moffel |
0.00% Armado |
2.94% Lumon |
|||||||||||||||
Cave F1 | 0.00% Moffel |
0.00% Armado |
4.00% Houndos |
0.00% Lumon |
4.00% Gauslime |
||||||||||||||
Cave F2*A | 0.00% Moffel Moffel |
2.78% Houndos |
6.25% Lumon Lumon |
0.00% Acie |
0.00% Mooby |
||||||||||||||
Cave F2*B | 0.00% Buzzlet |
0.00% Moffel Moffel |
6.25% Houndos Houndos |
0.00% Acie |
6.25% Mooby |
||||||||||||||
Hidden cave F1*HC*1 | 5.00% Lumasect |
10.00% Hountrion |
0.00% Dugterra |
5.00% Armadon |
10.00% Magnamire |
||||||||||||||
Hidden cave F1*HC*2 | 5.00% Lumasect |
5.00% Hountrion |
0.00% Dugterra |
5.00% Armadon |
10.00% Eclyptor |
Items
Area | Item | Location |
---|---|---|
BF1 | Skill Flash 22 x1 | Chest south of stairs |
HP Cake (S) x1 | Rock along north-most wall | |
HP Cake (S) x2 | Chest near ledge | |
SP Cake (S) x2 | ||
Stinky Scent x1 | ||
F0 | HP Cake (S) x1 | Chest within sand in the left dead-end |
Ber Fruit x1 | ||
Potent Scent x1 | Pillar on top path from dead-end chest | |
HP Cake (S) x1 | Chest in south-center area | |
LuxRecall x1 | Chest in north-east corner | |
Gold x350 | Pillar along east-most wall | |
HP Cake (M) x1 | Chest behind pillars in the eastern area | |
Heal Spinner x1 | Just above the north-east side ladder that leads to BF1 | |
Combi Cake (M) x2 | Chest between ledges in the eastern hallway | |
Static Spinner x2 | Chest just south of the north-west side ladder leading to F1 | |
Combi Cake (M) x2 | Chest next to ladder coming from the Fuse Room in the western-most area | |
F1 | HP Cake (S) x1 | Pillar right of the first pushable rock |
Combi Cake (S) x1 | Chest along path on the westernmost side | |
HP Cake (S) x1 | Chest west side, 3 levels of stairs up | |
SP Cake (S) x1 | ||
Spinner x1 | ||
Phoenix Shard x1 | Stalagmite near the sand, center of the map | |
Static Spinner x2 | Golden Chest in north-east area behind pushable rocks | |
HP Cake (S) x2 | ||
Cuco Fruit x2 | ||
LuxRecall x1 | Chest within sand in center area | |
Potent Scent x1 | Pillar between sandy areas in the center of the map | |
Fear Scent x1 | Left corner of south-center area blocked by a rock | |
Stinky Scent x1 | Golden chest in south-center area blocked by a rock | |
Combi Cake (S) x2 | ||
Ber Fruit x2 | ||
HP Cake (S) x1 | Chest between ledges in south-east area | |
Combi Cake (M) x1 | Chest in left corner of pillar maze | |
Skill Flash 4 x1 | Chest in right corner of pillar maze blocked by a rock | |
SP Cake (S) x1 | Chest near the exit ladder to F2 | |
F2 | Phoenix Shard x1 | Chest just north of entrance ladder |
Canul Fruit x1 | Pillar in south-center | |
Juba Fruit x2 | Chest within sand, south area | |
Cuco Fruit x2 | ||
Stinky Scent x1 | Chest in center | |
Gold x350 | Bones in sand | |
Spinner x1 | Pillar in north center | |
Ground Spinner x1 | Rock just left of exit hallway | |
Fuse Room | HP Cake (S) x1 | Chest top-left room |
Fear Scent x1 | Chest top-right room | |
HP Cake (M) x1 | Chest near exit ladder | |
SP Cake (M) x1 | ||
Hidden Cave 1 | ||
Escape Flash x1 | Silver chest left side of the room | |
Devolve Pill x1 | Silver chest top-right side of the room | |
Platinum Spinner x1 | Hidden in the stalagmite north side of the room | |
Fari Fruit x2 | Silver chest bottom-right of the room | |
Zum Fruit x2 | ||
Hidden Cave 2 | ||
Level Cake x1 | Hidden in the pillar to the left of the golden chest | |
XP Chip x2 | Golden chest in the centre of the room | |
Potent Scent x2 | ||
Amethio x1 |
Hidden Gems/Items location
Location | Item | Sell price |
---|---|---|
Thunderous Cave BF1 | ||
Green Gem (s) | 240 / 180 | |
Green Gem (l) | 4800 / 3600 | |
Red Gem (l) | 6400 / 4800 | |
Thunderous Cave F0 | ||
Blue Gem (s) | 160 / 120 | |
Blue Gem (m) | 800 / 600 | |
Green Gem (s) | 240 / 180 | |
Green Gem (l) | 4800 / 3600 | |
Red Gem (s) | 320 / 240 | |
Red Gem (l) | 6400 / 4800 | |
Thunderous Cave F1 | ||
Blue Gem (s) | 160 / 120 | |
Blue Gem (l) | 3200 / 2400 | |
Green Gem (s) | 240 / 180 | |
Green Gem (m) | 1200 / 900 | |
Green Gem (l) | 4800 / 3600 | |
Red Gem (s) | 320 / 240 | |
Thunderous Cave F2 | ||
Blue Gem (s) | 160 / 120 | |
Red Gem (s) | 320 / 240 | |
Red Gem (m) | 1600 / 1200 | |
Fuse Room | ||
Blue Gem (s) | 160 / 120 | |
Green Gem (l) | 4800 / 3600 | |
Red Gem (s) | 320 / 240 | |
Hidden Cave 1 | ||
Green Gem (m) | 1200 / 900 | |
Red Gem (s) | 320 / 240 | |
Red Gem (s) | 1600 / 1200 | |
Hidden Cave 2 | ||
Blue Gem (m) | 800 / 600 | |
Blue Gem (l) | 3200 / 2400 | |
Green Gem (l) | 4800 / 3600 |
Trainers
F0
|
|
|
F1
|
|
|
|
F2
|
|
|
Layout
Gallery
Hidden cave entrance in F1, requires TREMOR module
- Locations