Frozen Cavern: Difference between revisions
Jump to navigation
Jump to search
CoroMaster (talk | contribs) No edit summary |
PoppThePoop (talk | contribs) |
||
| (49 intermediate revisions by 7 users not shown) | |||
| Line 1: | Line 1: | ||
{{Quote|A natural cave formation deep within the Batavi Mountains. Local folklore speaks of monsters with big feet that lived here.|Area Description}} |
{{Quote|A natural cave formation deep within the Batavi Mountains. Local folklore speaks of monsters with big feet that lived here.|Area Description}} |
||
'''Frozen Cavern''' is a cave system that connects to [[Fresia Pass]] and [[ |
'''Frozen Cavern''' is a cave system that connects to [[Fresia Pass]] and [[Frostpeak]]. It cannot be entered until the story at [[Alavi]] is complete. It is the home of [[Vørst]] the [[Ice Type|Ice]] [[Titan]]. |
||
==Description== |
==Description== |
||
As the name implies, the Frozen Cavern is a cave system that is frozen, and features multiple sliding puzzles that must be solved to reach items and to move forward. |
As the name implies, the Frozen Cavern is a cave system that is frozen, and features multiple sliding puzzles that must be solved to reach items and to move forward. |
||
===Music=== |
===Music Theme=== |
||
[[File:Snowbound Mountain - Fresia Pass.mp3]] |
|||
This theme plays when the player is on '''{{PAGENAME}}'''. (''For Mobile Users, click [[:File:Snowbound Mountain - Fresia Pass.mp3|here]]'') |
|||
==Coromon Located Here== |
==Coromon Located Here== |
||
| Line 16: | Line 19: | ||
! scope="col" style="text-align:center; width:20%" |Double Battle |
! scope="col" style="text-align:center; width:20%" |Double Battle |
||
|- |
|- |
||
| data-sort-value=" |
| data-sort-value="Krybeest" |{{A|Kryo}} |
||
| style="text-align:center;" | |
| style="text-align:center;" |WIP |
||
| style="text-align:center;" |Common |
| style="text-align:center;" |Common |
||
| style="text-align:center;" | |
| style="text-align:center;" |F3 - Hidden cave |
||
| style="text-align:center;" | |
| style="text-align:center;" | |
||
|- |
|||
| data-sort-value="Krybeest" |{{A|Krypeek}} |
|||
| style="text-align:center;" |WIP |
|||
| style="text-align:center;" |Common |
|||
| style="text-align:center;" |F3 - Hidden cave |
|||
| style="text-align:center;" |F3 - Hidden cave |
|||
|- |
|- |
||
| data-sort-value="Krybeest" |{{A|Krybeest}} |
| data-sort-value="Krybeest" |{{A|Krybeest}} |
||
| style="text-align:center;" | |
| style="text-align:center;" |44-58 |
||
| style="text-align:center;" |Common |
| style="text-align:center;" |Common |
||
| style="text-align:center;" |F1,F2,F3 |
| style="text-align:center;" |F1, F2, F3, F3A, F3 - Hidden cave, F4 |
||
| style="text-align:center;" | |
| style="text-align:center;" | |
||
|- |
|- |
||
| data-sort-value=" |
| data-sort-value="Froshell" |{{A|Froshell}} |
||
| style="text-align:center;" | |
| style="text-align:center;" |40-50 |
||
| style="text-align:center;" |Rare |
| style="text-align:center;" |Rare |
||
| style="text-align:center;" |F1, |
| style="text-align:center;" |F1, F4 |
||
| style="text-align:center;" | |
| style="text-align:center;" |❌ |
||
|- |
|- |
||
| data-sort-value=" |
| data-sort-value="Glamoth" |{{A|Glamoth}} |
||
| style="text-align:center;" | |
| style="text-align:center;" |45-64 |
||
| style="text-align:center;" |Rare |
| style="text-align:center;" |Rare |
||
| style="text-align:center;" |F1,F4 |
| style="text-align:center;" |F1, F2, F3A, F4 |
||
| style="text-align:center;" | |
| style="text-align:center;" |❌ |
||
|- |
|- |
||
| data-sort-value=" |
| data-sort-value="Blizzburd" |{{A|Blizzburd}} |
||
| style="text-align:center;" | |
| style="text-align:center;" |40-58 |
||
| style="text-align:center;" |Common |
|||
| style="text-align:center;" |F2, F3 |
|||
| style="text-align:center;" |❌ |
|||
|- |
|||
| data-sort-value="Blizzian" |{{A|Blizzian}} |
|||
| style="text-align:center;" |42-54 |
|||
| style="text-align:center;" |Common |
|||
| style="text-align:center;" |F1, F2, F3, F4 |
|||
| style="text-align:center;" |❌ |
|||
|- |
|||
| data-sort-value="Magnamire" |{{A|Magnamire}} |
|||
| style="text-align:center;" |45-51 |
|||
| style="text-align:center;" |Common |
| style="text-align:center;" |Common |
||
| style="text-align:center;" |F1 |
| style="text-align:center;" |F1 |
||
| style="text-align:center;" | |
| style="text-align:center;" | |
||
|- |
|- |
||
| data-sort-value=" |
| data-sort-value="Pitterbyte" |{{A|Pitterbyte}} |
||
| style="text-align:center;" | |
| style="text-align:center;" |45-51 |
||
| style="text-align:center;" |Common |
| style="text-align:center;" |Common |
||
| style="text-align:center;" |F1 |
| style="text-align:center;" |F1 |
||
| style="text-align:center;" | |
| style="text-align:center;" | |
||
|- |
|- |
||
| data-sort-value="Humbee" |{{A|Humbee}} |
| data-sort-value="Humbee" |{{A|Humbee}} |
||
| style="text-align:center;" |51 |
| style="text-align:center;" |48-51 |
||
| style="text-align:center;" |Common |
| style="text-align:center;" |Common |
||
| style="text-align:center;" |F2 |
| style="text-align:center;" |F2 |
||
| style="text-align:center;" | |
| style="text-align:center;" | |
||
|- |
|||
| data-sort-value="Blizzburd" |{{A|Blizzburd}} |
|||
| style="text-align:center;" |40-58 |
|||
| style="text-align:center;" |Common |
|||
| style="text-align:center;" |F2,F3 |
|||
| style="text-align:center;" |x |
|||
|- |
|- |
||
| data-sort-value="Armadon" |{{A|Armadon}} |
| data-sort-value="Armadon" |{{A|Armadon}} |
||
| Line 71: | Line 86: | ||
|- |
|- |
||
| data-sort-value="Malavite" |{{A|Malavite}} |
| data-sort-value="Malavite" |{{A|Malavite}} |
||
| style="text-align:center;" |49 |
| style="text-align:center;" |46-49 |
||
| style="text-align:center;" |Common |
| style="text-align:center;" |Common |
||
| style="text-align:center;" |F3 |
| style="text-align:center;" |F3, F3A |
||
| style="text-align:center;" | |
| style="text-align:center;" | |
||
|- |
|- |
||
| data-sort-value="Atlantern" |{{A|Atlantern}} |
| data-sort-value="Atlantern" |{{A|Atlantern}} |
||
| style="text-align:center;" |59 |
| style="text-align:center;" |53-59 |
||
| style="text-align:center;" |Common |
| style="text-align:center;" |Common |
||
| style="text-align:center;" |F4 |
| style="text-align:center;" |F4 |
||
| Line 83: | Line 98: | ||
|- |
|- |
||
| data-sort-value="Bearealis" |{{A|Bearealis}} |
| data-sort-value="Bearealis" |{{A|Bearealis}} |
||
| style="text-align:center;" |48- |
| style="text-align:center;" |48-61 |
||
| style="text-align:center;" |Rare |
| style="text-align:center;" |Rare |
||
| style="text-align:center;" | |
| style="text-align:center;" |F4 |
||
| style="text-align:center;" | |
| style="text-align:center;" | |
||
|- |
|- |
||
| Line 97: | Line 112: | ||
|- |
|- |
||
| rowspan="4" |F1 |
| rowspan="4" |F1 |
||
| style="text-align:left" | {{I| |
| style="text-align:left" | {{I|Gold}} x6000 |
||
| First Item Chest |
| First Item Chest |
||
|- |
|- |
||
| Line 106: | Line 121: | ||
| Second Chest |
| Second Chest |
||
|- |
|- |
||
| style="text-align:left" | {{I|Platinum Spinner}} |
| style="text-align:left" | {{I|Platinum Spinner}} x1 |
||
| Last rock of the area |
| Last rock of the area |
||
|- |
|- |
||
| Line 122: | Line 137: | ||
| Second Chest |
| Second Chest |
||
|- |
|- |
||
| rowspan=" |
| rowspan="6" |F3 |
||
| style="text-align:left" | {{I|HP |
| style="text-align:left" | {{I|HP Cake (L)}} x1 |
||
| First Chest |
| rowspan="2" | First Chest |
||
|- |
|||
| style="text-align:left" | {{I|SP Cake (L)}} x1 |
|||
|- |
|- |
||
| style="text-align:left" | {{I|HP Cake ( |
| style="text-align:left" | {{I|HP Cake (XL)}} x1 |
||
| Skull in the icy spot after getting past the first icy area. |
| Skull in the icy spot after getting past the first icy area. |
||
|- |
|- |
||
| Line 134: | Line 151: | ||
| style="text-align:left" | {{I|Fear Scent}} x1 |
| style="text-align:left" | {{I|Fear Scent}} x1 |
||
| Third Chest |
| Third Chest |
||
|- |
|||
| style="text-align:left" | {{I|Paya Fruit}} x1 |
|||
| Fourth Silver Chest above exit to F4 |
|||
|- |
|- |
||
| rowspan="2" |F3A |
| rowspan="2" |F3A |
||
| Line 142: | Line 162: | ||
| Hidden in a Rock. |
| Hidden in a Rock. |
||
|- |
|- |
||
| rowspan="3" | |
| rowspan="3" |F3 - Hidden cave |
||
| style="text-align:left" | {{I| |
| style="text-align:left" | {{I|Skill Flash 23}} x1 |
||
| Inside the silver chest on the left. |
|||
|- |
|||
| style="text-align:left" | {{I|Gauntlet Coupon}} x1 |
|||
| Inside the silver chest on the right. |
|||
|- |
|||
| style="text-align:left" | {{I|Energiser Gem}} x1 |
|||
| Inside the golden chest. |
|||
|- |
|||
| rowspan="4" |F4 |
|||
| style="text-align:left" | {{I|Icy Spinner}} x2 |
|||
| First Chest |
| First Chest |
||
|- |
|- |
||
| style="text-align:left" | {{I|Combi Cake (M) |
| style="text-align:left" | {{I|Combi Cake (M)}} x2 |
||
| Second Chest |
| Second Chest |
||
|- |
|- |
||
| Line 152: | Line 182: | ||
| Last pillar in area |
| Last pillar in area |
||
|- |
|- |
||
| style="text-align:left" | {{I|Attack Cake (L)}} x1 |
|||
| rowspan="5" |F4 |
|||
| Right hand pillar in L-Shape Hallway of Ice Puzzle |
|||
|- |
|||
| rowspan="5" |F5 |
|||
| style="text-align:left" | {{I|Cado Fruit}} x1 |
| style="text-align:left" | {{I|Cado Fruit}} x1 |
||
| On a Rock |
| On a Rock |
||
| Line 162: | Line 195: | ||
| Second Chest |
| Second Chest |
||
|- |
|- |
||
| style="text-align:left" | {{I|Combi Cake (XL) |
| style="text-align:left" | {{I|Combi Cake (XL)}} x2 |
||
| Third Chest |
| Third Chest |
||
|- |
|- |
||
| style="text-align:left" | {{I|Phoenix Stone}} x1 |
| style="text-align:left" | {{I|Phoenix Stone}} x1 |
||
| On a Stalactite |
| On a Stalactite |
||
|- |
|||
| rowspan="1" |F6 |
|||
| style="text-align:left" | {{I|Level Cake}} x1 |
|||
| Center of Vørst's platform |
|||
|- |
|||
|} |
|} |
||
==Hidden Gems/Items location== |
|||
==Trainers== |
|||
{| class="article-table mw-collapsible" border="0" cellspacing="1" cellpadding="1" width="100%"; |
|||
! colspan="3"| |
|||
|- |
|||
! scope="col" style="text-align:center; width:25%"|Location |
|||
! scope="col" style="text-align:center;"|[[File:GEM_RED_1.png|25px]]Item |
|||
! scope="col" style="text-align:center; width:15%"|{{Gold}} Sell price |
|||
|- |
|||
! colspan="3" style="text-align:center; font-weight:bold; background-color:#292330;" | Frozen Cavern F1 |
|||
|- |
|||
|style="text-align:center"|[[File:FrozenCavernF1Gem1.png|150px]] |
|||
|style="text-align:center"|{{I|GEM_RED_2}} |
|||
|style="text-align:center"|[[File:DRILL_SHOVEL_SILVER.png|25px]]1600 / [[File:DRILL_SHOVEL_GOLD.png|25px]]1200 |
|||
|- |
|||
|style="text-align:center"|[[File:FrozenCavernF1Gem2.png|150px]] |
|||
|style="text-align:center"|{{I|GEM_GREEN_1}} |
|||
|style="text-align:center"|[[File:DRILL_SHOVEL_SILVER.png|25px]]240 / [[File:DRILL_SHOVEL_GOLD.png|25px]]180 |
|||
|- |
|||
|style="text-align:center"|[[File:FrozenCavernF1Gem3.png|150px]] |
|||
|style="text-align:center"|{{I|GEM_GREEN_2}} |
|||
|style="text-align:center"|[[File:DRILL_SHOVEL_SILVER.png|25px]]1200 / [[File:DRILL_SHOVEL_GOLD.png|25px]]900 |
|||
|- |
|||
! colspan="3" style="text-align:center; font-weight:bold; background-color:#292330;" | Frozen Cavern F2 |
|||
|- |
|||
|style="text-align:center"|[[File:FrozenCavernF2Gem1.png|150px]] |
|||
|style="text-align:center"|{{I|GEM_GREEN_2}} |
|||
|style="text-align:center"|[[File:DRILL_SHOVEL_SILVER.png|25px]]1200 / [[File:DRILL_SHOVEL_GOLD.png|25px]]900 |
|||
|- |
|||
|style="text-align:center"|[[File:FrozenCavernF2Gem2.png|150px]] |
|||
|style="text-align:center"|{{I|GEM_BLUE_1}} |
|||
|style="text-align:center"|[[File:DRILL_SHOVEL_SILVER.png|25px]]180 / [[File:DRILL_SHOVEL_GOLD.png|25px]]120 |
|||
|- |
|||
|style="text-align:center"|[[File:FrozenCavernF2Gem3.png|150px]] |
|||
|style="text-align:center"|{{I|GEM_GREEN_1}} |
|||
|style="text-align:center"|[[File:DRILL_SHOVEL_SILVER.png|25px]]240 / [[File:DRILL_SHOVEL_GOLD.png|25px]]180 |
|||
|- |
|||
|style="text-align:center"|[[File:FrozenCavernF2Gem4.png|150px]] |
|||
|style="text-align:center"|{{I|GEM_GREEN_2}} |
|||
|style="text-align:center"|[[File:DRILL_SHOVEL_SILVER.png|25px]]1200 / [[File:DRILL_SHOVEL_GOLD.png|25px]]900 |
|||
|- |
|||
! colspan="3" style="text-align:center; font-weight:bold; background-color:#292330;" | Frozen Cavern F3 |
|||
|- |
|||
|style="text-align:center"|[[File:FrozenCavernF3Gem1.png|150px]] |
|||
|style="text-align:center"|{{I|GEM_GREEN_1}} |
|||
|style="text-align:center"|[[File:DRILL_SHOVEL_SILVER.png|25px]]240 / [[File:DRILL_SHOVEL_GOLD.png|25px]]180 |
|||
|- |
|||
|style="text-align:center"|[[File:FrozenCavernF3Gem2.png|150px]] |
|||
|style="text-align:center"|{{I|GEM_RED_2}} |
|||
|style="text-align:center"|[[File:DRILL_SHOVEL_SILVER.png|25px]]1600 / [[File:DRILL_SHOVEL_GOLD.png|25px]]1200 |
|||
|- |
|||
|style="text-align:center"|[[File:FrozenCavernF3Gem3.png|150px]] |
|||
|style="text-align:center"|{{I|GEM_RED_1}} |
|||
|style="text-align:center"|[[File:DRILL_SHOVEL_SILVER.png|25px]]320 / [[File:DRILL_SHOVEL_GOLD.png|25px]]240 |
|||
|- |
|||
! colspan="3" style="text-align:center; font-weight:bold; background-color:#292330;" | Frozen Cavern F3A |
|||
|- |
|||
|style="text-align:center"|''There are no hidden gems/items in this map.'' |
|||
|style="text-align:center"|''None'' |
|||
|style="text-align:center"|[[File:DRILL_SHOVEL_SILVER.png|25px]]''N/A'' / [[File:DRILL_SHOVEL_GOLD.png|25px]]''N/A'' |
|||
|- |
|||
! colspan="3" style="text-align:center; font-weight:bold; background-color:#292330;" | Frozen Cavern F3 - Hidden cave |
|||
|- |
|||
|style="text-align:center"|''There are no hidden gems/items in this map.'' |
|||
|style="text-align:center"|''None'' |
|||
|style="text-align:center"|[[File:DRILL_SHOVEL_SILVER.png|25px]]''N/A'' / [[File:DRILL_SHOVEL_GOLD.png|25px]]''N/A'' |
|||
|- |
|||
! colspan="3" style="text-align:center; font-weight:bold; background-color:#292330;" | Frozen Cavern F4 |
|||
|- |
|||
|style="text-align:center"|[[File:FrozenCavernF4Gem1.png|150px]] |
|||
|style="text-align:center"|{{I|GEM_BLUE_3}} |
|||
|style="text-align:center"|[[File:DRILL_SHOVEL_SILVER.png|25px]]3200 / [[File:DRILL_SHOVEL_GOLD.png|25px]]2400 |
|||
|- |
|||
|style="text-align:center"|[[File:FrozenCavernF4Gem2.png|150px]] |
|||
|style="text-align:center"|{{I|GEM_RED_2}} |
|||
|style="text-align:center"|[[File:DRILL_SHOVEL_SILVER.png|25px]]1600 / [[File:DRILL_SHOVEL_GOLD.png|25px]]1200 |
|||
|- |
|||
! colspan="3" style="text-align:center; font-weight:bold; background-color:#292330;" | Frozen Cavern F5 |
|||
|- |
|||
|style="text-align:center"|''There are no hidden gems/items in this map.'' |
|||
|style="text-align:center"|''None'' |
|||
|style="text-align:center"|[[File:DRILL_SHOVEL_SILVER.png|25px]]''N/A'' / [[File:DRILL_SHOVEL_GOLD.png|25px]]''N/A'' |
|||
|- |
|||
! colspan="3" style="text-align:center; font-weight:bold; background-color:#292330;" | Frozen Cavern F6 |
|||
|- |
|||
|style="text-align:center"|''There are no hidden gems/items in this map.'' |
|||
|style="text-align:center"|''None'' |
|||
|style="text-align:center"|[[File:DRILL_SHOVEL_SILVER.png|25px]]''N/A'' / [[File:DRILL_SHOVEL_GOLD.png|25px]]''N/A'' |
|||
|- |
|||
! colspan="3" style="text-align:center; font-weight:bold; background-color:#292330;" | Frozen Cavern F6A |
|||
|- |
|||
|style="text-align:center"|[[File:FrozenCavernF6AGem1.png|150px]] |
|||
|style="text-align:center"|{{I|GEM_RED_3}} |
|||
|style="text-align:center"|[[File:DRILL_SHOVEL_SILVER.png|25px]]6400 / [[File:DRILL_SHOVEL_GOLD.png|25px]]4800 |
|||
|- |
|||
|style="text-align:center"|[[File:FrozenCavernF6AGem2.png|150px]] |
|||
|style="text-align:center"|{{I|GEM_BLUE_3}} |
|||
|style="text-align:center"|[[File:DRILL_SHOVEL_SILVER.png|25px]]3200 / [[File:DRILL_SHOVEL_GOLD.png|25px]]2400 |
|||
|- |
|||
|} |
|||
==Trainers== |
|||
<div class="mw-collapsible"> |
|||
''There are no Trainers here.'' |
|||
==Gallery== |
==Gallery== |
||
<gallery> |
|||
File:FrozenCavernHiddenCaveF3.png|The entrance of the hidden cave in [[Frozen Cavern|Frozen Cavern F3]] (requires [[File:Tremor.png|20px]] [[Module|Tremor module]]). |
|||
</gallery> |
|||
[[Category:Locations]] |
[[Category:Locations]] |
||
[[es:Caverna helada]] |
|||
Latest revision as of 21:31, 16 April 2024
| “ | A natural cave formation deep within the Batavi Mountains. Local folklore speaks of monsters with big feet that lived here. | ” |
| ~ Area Description |
Frozen Cavern is a cave system that connects to Fresia Pass and Frostpeak. It cannot be entered until the story at Alavi is complete. It is the home of Vørst the Ice Titan.
Description
As the name implies, the Frozen Cavern is a cave system that is frozen, and features multiple sliding puzzles that must be solved to reach items and to move forward.
Music Theme
This theme plays when the player is on Frozen Cavern. (For Mobile Users, click here)
Coromon Located Here
| Coromon | Level | Rarity | Area | Double Battle |
|---|---|---|---|---|
| WIP | Common | F3 - Hidden cave | ||
| WIP | Common | F3 - Hidden cave | F3 - Hidden cave | |
| 44-58 | Common | F1, F2, F3, F3A, F3 - Hidden cave, F4 | ||
| 40-50 | Rare | F1, F4 | ❌ | |
| 45-64 | Rare | F1, F2, F3A, F4 | ❌ | |
| 40-58 | Common | F2, F3 | ❌ | |
| 42-54 | Common | F1, F2, F3, F4 | ❌ | |
| 45-51 | Common | F1 | ||
| 45-51 | Common | F1 | ||
| 48-51 | Common | F2 | ||
| 51-55 | Common | F3 | ||
| 46-49 | Common | F3, F3A | ||
| 53-59 | Common | F4 | ||
| 48-61 | Rare | F4 |
Items
| Area | Item | Location |
|---|---|---|
| F1 | First Item Chest | |
| Pillar in middle of area | ||
| Second Chest | ||
| Last rock of the area | ||
| F2 | Rock left of Enterence | |
| First Chest | ||
| Pillar along the east side of the second icy area. | ||
| Second Chest | ||
| F3 | First Chest | |
| Skull in the icy spot after getting past the first icy area. | ||
| Second Chest | ||
| Third Chest | ||
| Fourth Silver Chest above exit to F4 | ||
| F3A | Only Chest in the area. | |
| Hidden in a Rock. | ||
| F3 - Hidden cave | Inside the silver chest on the left. | |
| Inside the silver chest on the right. | ||
| Inside the golden chest. | ||
| F4 | First Chest | |
| Second Chest | ||
| Last pillar in area | ||
| Right hand pillar in L-Shape Hallway of Ice Puzzle | ||
| F5 | On a Rock | |
| First Chest | ||
| Second Chest | ||
| Third Chest | ||
| On a Stalactite | ||
| F6 | Center of Vørst's platform |
Hidden Gems/Items location
| Location | ||
|---|---|---|
| Frozen Cavern F1 | ||

|
||

|
||

|
||
| Frozen Cavern F2 | ||

|
||

|
||

|
||

|
||
| Frozen Cavern F3 | ||

|
||

|
||

|
||
| Frozen Cavern F3A | ||
| There are no hidden gems/items in this map. | None | |
| Frozen Cavern F3 - Hidden cave | ||
| There are no hidden gems/items in this map. | None | |
| Frozen Cavern F4 | ||

|
||

|
||
| Frozen Cavern F5 | ||
| There are no hidden gems/items in this map. | None | |
| Frozen Cavern F6 | ||
| There are no hidden gems/items in this map. | None | |
| Frozen Cavern F6A | ||

|
||

|
||
Trainers
There are no Trainers here.
Gallery
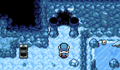
The entrance of the hidden cave in Frozen Cavern F3 (requires
 Tremor module).

Category:
- Locations