Scorching Sands

The Scorching Sands is a very hot area situated within the Wostin Desert, between the South and the North caves. This area has a unique mechanic where every step taken on the scorching sand will increase the Heat Meter bar on the (left) side of the screen; too many steps will cause the player to overheat and prompts a RETRY screen. Standing under the tents, located throughout the area, will reduce the heat meter over time; walking on the rock paths or grass will not increase the Heat Meter bar.
Description
Scorching Sands consists of orange patches of grass with Coromon around level 22.
The Grass patch B, across the bridge to the north-east, is where ![]() Molteye can be found early in the game. In order to reach this area the player must purchase
Molteye can be found early in the game. In order to reach this area the player must purchase ![]() Sol Soda cans, sold by Amad in Darudic Spa for
Sol Soda cans, sold by Amad in Darudic Spa for ![]() 2249 each, that can be used to reduce the Heat Meter bar by approximately 50%.
2249 each, that can be used to reduce the Heat Meter bar by approximately 50%.
Coromon Located Here
| Coromon | Level | Rarity | Area | Double Battle | Triple Battle |
|---|---|---|---|---|---|
| 18-28 | Common | A - B | A | ❌ | |
| 21-26 | Common | B | ❌ | ❌ | |
| 23-26 | Common | B | ❌ | ❌ | |
| 23-25 | Uncommon | A | ❌ | ❌ | |
| 20-22 | Rare | A | ❌ | ❌ | |
| 23-25 | Rare | A | ❌ | ❌ |
Encounter Rates
| Zone | Rates | ||||||
|---|---|---|---|---|---|---|---|
| Grass A | 17.00% |
17.00% |
17.00% |
17.00% |
32.00% |
||
| Grass B | 17.00% |
50.00% |
33.00% | ||||
Rates for fruits held during battles
| Zone | Rates for fruits held during battles | ||||||
|---|---|---|---|---|---|---|---|
| Grass A | 0.00% |
17.65% |
5.88% |
0.00% |
0.00% |
||
| Grass B | 5.88% |
12.00% |
9.09% | ||||
Items
| Area | Item | Location |
|---|---|---|
| Scorching Sands | Chest across grass path at entrance | |
| Rock near broken bridge | ||
| Big rock on hardened dirt ground to the west | ||
| Chest near tent before the bridge | ||
| Chest north of the bridge | ||
| Chest at the edge of cliff | ||
| Hidden in the middle of the area north of the tent to the left of the non-broken bridge | ||
| Hidden in the cactus in the north-west part of the map | ||
| Golden chest north of broken bridge[1] | ||
| Chest north of broken bridge[1] | ||
| Rock beside tent north of broken bridge[1] | ||
| Rock north of tent north of broken bridge[1] | ||
| Golden chest beside palm tree north of broken bridge[1] |
Hidden Gems/Items location
| Location | ||
|---|---|---|
| Scorching Sands | ||

|
||

|
||

|
||

|
||

|
||

|
||

|
||

|
||

|
||

|
||

|
||

|
||

|
||

|
||

|
||
Trainers
Scorching Sands
| ||||||||||||||||||||||||||||||||||||||||||||||||||||||||||||||

| ||||||||||||||||||||||||||||||||||||||||||||||||||||||


| ||||||||||||||||||||||||||||||||||||||||||||||||||||||||||||||


Achievement
![]() Hyperthermia: this sauna is too much.
Hyperthermia: this sauna is too much.
How to get: overheat while wearing a Towel.
![]() Hot Noodles: evolve a
Hot Noodles: evolve a ![]() Slitherpin before level 25.
Slitherpin before level 25.
How to get: overheat while Slitherpin is the first Coromon of the squad.
![]() A Bridge too Far: cross the bridge in the Scorching Sands safely.
A Bridge too Far: cross the bridge in the Scorching Sands safely.
How to get: use a ![]() Sol Soda, to prevent overheat, and cross the bridge in the North-East part of the map.
Sol Soda, to prevent overheat, and cross the bridge in the North-East part of the map.
Gallery

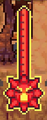
Empty Heat Meter bar (no steps on the sand).
Full Heat Meter bar; one more step to overheat.

One of the tents located throughout the area; necessary to prevent overheat.


- Article stubs
- Locations