Torre energética
| “ | ¡La Torre energética es una construcción fascinante! Se construyó para hacer de pararrayos capaz de almacenar la energía de los rayos que la impactan. Esa energía se transporta a toda Velua.
|
” |
| ~ Max ~ |

La Torre energética es una de las subzonas que encontrarás en Isla Donar. The first titan, Voltgar, can be found at the top of the tower which was built to gather electricity from the titan to power all of Velua. The tower is a multi-floored area with numerous trainers and challenging puzzles. These puzzles include operating switches to open and close doors, riding conveyor belts, and solving a color-based code.
Descripción
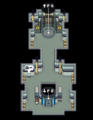
La torre energética tiene 7 pisos, accesibles mediante ascensores en cada piso.
| Puntos de control: | F1 | F2 | F3 | F4 | F5 | F6 |
|---|
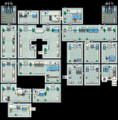
F1

The first floor has a simple puzzle involving the use of letter correlated switches to open and close doors to gain access to the elevator room.
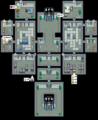
F2

The second floor features a more advanced switch and door puzzle.
F3

The third floor introduces conveyor belts, the player must find the right ones to take to reach the elevator.
F4

The fourth floor involves a color-based code created by Mr. Mind which the player must solve before proceeding. Players may return to solve the puzzle again even after completing it.
F5

The fifth and final puzzle-based floor of the Power Tower. This floor incorporates both switches and conveyor belts.
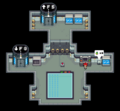
F6

The sixth floor of Power Tower where a checkpoint is received.
F7

The final floor of Power Tower where Voltgar can be challenged.
Tema musical
Esta música suena cuando el jugador está en la Torre energética (Para usuarios de la versión móvil, pulsar aquí)
Distribución

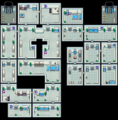
F1 Ubicaciones de objetos y solución de puzle
F2 Ubicaciones de objetos y solución de puzle
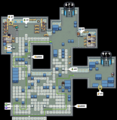
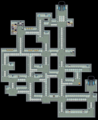
F3 Ubicaciones de objetos y solución de puzle
F4 Ubicaciones de objetos
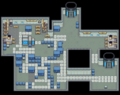
F5 Ubicaciones de objetos y solución de puzle
F6 Ubicaciones de objetos


Puzzle Solutions & Strategies
Below are tables of the required switch states for each step of the solution for their respective floors. A switch is considered to be OFF in its initial state and ON if the lever has been pulled down. Table cells with "ON" or "OFF" denote the switch be flipped to that state in that step. Cells with "o" indicate the switch must be in the ON state before flipping any other switches. Cells with "/" demand the switch be in the OFF state before flipping other switches.
F1
| Steps | |||||
|---|---|---|---|---|---|
| Switch | 1 | 2 | 3 | 4 | 5 |
| A | ON | o | |||
| C | ON | o | |||
| D | ON | ||||
| E | ON | o | |||
| L | ON | o | |||
F2
Part 1
The solution to the first half takes place on the east side only. The side is sectioned off by a singular door tied to the E switch, after the E door is open the states of these switches will not effect the solution on the west side.
| Steps | |||||||||
|---|---|---|---|---|---|---|---|---|---|
| Switches | 1 | 2 | 3 | 4 | 5 | 6 | 7 | 8 | 9 |
| C | ON | OFF | / | ON | |||||
| E | ON | ||||||||
| F | ON | o | o | OFF | / | ||||
| G | ON | o | |||||||
| I | ON | o | OFF | / | / | ||||
Part 2
The west side beyond the E door. Switches on the east side have no effect on the solution in this area.
| Steps | ||||||||||
|---|---|---|---|---|---|---|---|---|---|---|
| Switches | 10 | 11 | 12 | 13 | 14 | 15 | 16 | 17 | 18 | 19 |
| A | / | ON | o | OFF | / | ON | o | |||
| D | ON | o | OFF | |||||||
| H | ON | o | ||||||||
| J | ON | o | OFF | / | ||||||
| K | ON | o | ||||||||
| L | ON | o | ||||||||
F3
Refer to following map for the most efficient path:
F4
For Mr. Mind's puzzle, the player is forced to take a random guess on their first attempt then proceed to correct each guess through trial and error. This puzzle can be cheesed by saving after Mr. Mind generates the code, allowing the player to load their save to make as many attempts without having to trigger the twists.
An efficient method used by speedrunners to crack the code starts off with inputting only one fuse and swapping until its registered as a ✔ before moving onto guessing the next fuse. If a ↔ appears instead, swap the current fuse and add another fuse in its spot and continue moving and swapping the fuses until all are correct.
Example Solution
| Fuses | ✔️ | ↔ | ❌ | Notes |
|---|---|---|---|---|
| 🟢 grn |
1 | - | - | Guess any color for the 1st slot. Luckily, its correct. |
| 🟢🔴 grn red |
1 | 1 | - | Guess another color for the 2nd slot, looks like we have to change the position of the red fuse. |
| 🟢🔵🔴 grn blu red |
1 | 2 | - | We move over the red fuse one slot over and guess another color for the 2nd slot. Now it looks like both the red and blue fuses need to change position. |
| 🟢🟠🔵🔴 grn orn blu red |
4 | - | - | We move both the red and blue fuses once more and guess another color for the 2nd slot. Luckily, orange is the right color and the puzzle is solved. |
F5
| Steps | ||||||||||
|---|---|---|---|---|---|---|---|---|---|---|
| Switches | 1 | 2 | 3 | 4 | 5 | 6 | 7 | 8 | 9 | 10 |
| A | ON | o | o | |||||||
| D | / | / | ON | |||||||
| E | / | ON | o | |||||||
| F | ON | o | OFF | |||||||
| G | ON | o | OFF | |||||||
| H | ON | o | OFF | |||||||
| I | / | ON | ||||||||
Items
| Area | Item | Location |
|---|---|---|
| F1 | En el cuarto de la puerta de la izquierda tras entrar en la torre (letra C). Está en el interior de un cofre en el centro del cuarto. | |
| En el cuarto de la letra L abierto al entrar en la torre. Está en el interior de un cofre en la esquina superior derecha del cuarto. | ||
| En el cuarto de la letra L abierto al entrar en la torre. Está en el interior del mostrador del oeste, en el lado derecho del mismo. | ||
| En el cuarto de la letra E abierto al entrar en la torre. Está en el interior de un cofre en la esquina inferior izquierda del cuarto. | ||
| En el primer cuarto abierto con la letra D. Está en el mostrador de la parte superior del cuarto. | ||
| F2 | En el pasillo principal del segundo piso. Está en el mostrador junto a la puerta G. | |
| En el primer cuarto al que tienes acceso por una puerta F en el segundo piso. Está en el mostrador de la izquierda. | ||
| En el segundo cuarto con un interruptor C. Está en un cofre al oeste de la sala. | ||
| En el primer cuarto con un interruptor G. Está en el cofre dorado al este. | ||
| En el primer cuarto con un interruptor E. Está en un cofre plateado al oeste. | ||
| En el cuarto abierto al pulsar el primer interruptor E. Está en un cofre justo al sur tras atravesar la primera puerta de entrada. | ||
| En el cuarto con el interruptor D. Está en la torre de servidor de la derecha. | ||
| En el pasillo al cruzar la puerta H. Está en la torre de servidor de la izquierda. | ||
| En la sala de la puerta K. Está en un cofre plateado al noroeste. | ||
| Flower stand in southernmost room | ||
| F3 | A la derecha del primer entrenador tras salir del ascensor. Está dentro de un cofre. | |
| En un pequeño trozo entre cintas, al usar la cinta más al sur tras salir del ascensor. Está en un cofre. | ||
| En la zona a la que llegas usando la cinta oeste superior, y luego yendo al norte. Está en un cofre en el centro de la sala. | ||
| En la misma zona anterior. Está en la torre de servidor al noroeste. | ||
| En un pequeño trozo entre cintas, al usar la cinta más al oeste en la zona anterior. Está en un cofre. | ||
| En un pequeño trozo entre cintas, al usar la cinta más al sur en la zona anterior, y luego la cinta al este. Está en un cofre. | ||
| En un pequeño trozo entre cintas, al sur del mapa. Está en el cofre más al oeste. | ||
| En un pequeño trozo entre cintas, al sur del mapa. Está en el cofre más al este. | ||
| En el cuarto al este, tras superar la zona de cintas. Está en una caja pequeña al sur, entre dos contenedores grandes. | ||
| F4 | Al lado de la máquina de Mr. Mind. Está en un cofre. | |
| F5 | Bottom-left ground tile in H switch room | |
| En el cuarto pequeño bajo la habitación con el interruptor H. Está en un cofre. | ||
| En el cuarto con el interruptor A. Está en el mostrador en la esquina noroeste. | ||
| En el cuarto con los interruptores D y F. Está en un cofre en la esquina sureste. | ||
| En el cuarto con el interruptor E. Está en un cofre en la esquina suroeste. | ||
| En la sala con el interruptor I. Está en un cofre dorado al sur. | ||
| F6 | Cofre en el lado izquierdo | |
| F7 | Vencer al Titán Voltgar |
Entrenadores
F1
Plantilla:TrainerBattle/2 Plantilla:TrainerBattle/3
F2
Plantilla:TrainerBattle/2
| |||||||||||||||||||||||||||||||||||||


Plantilla:TrainerBattle/4 Plantilla:TrainerBattle/2 Plantilla:TrainerBattle/3
F3
| |||||||||||||||||||||||||||||||||||||


Plantilla:TrainerBattle/2 Plantilla:TrainerBattle/2 Plantilla:TrainerBattle/3
F5
Plantilla:TrainerBattle/2 Plantilla:TrainerBattle/3 Plantilla:TrainerBattle/4
Plantilla:TrainerBattle/2Galería
Pantalla de batalla
Fondo de la batalla con Voltgar
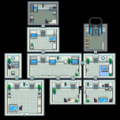
F1 en versiones anteriores
F2 en versiones anteriores
F3 en versiones anteriores
F5 en versiones anteriores


- Ubicaciones