Pyramid of Sart: Difference between revisions
Aoimira (talk | contribs) m (→Items) |
m (→Items) |
||
| Line 292: | Line 292: | ||
| Pillar top-left corner on Skuldra statue puzzle room |
| Pillar top-left corner on Skuldra statue puzzle room |
||
|- |
|- |
||
| style="text-align:left"| {{I|Cowboy Hat |
| style="text-align:left"| {{I|Cowboy Hat}} x1 |
||
| rowspan="9"| Solve the Skuldra Statue Puzzle |
| rowspan="9"| Solve the Skuldra Statue Puzzle |
||
|- |
|- |
||
Revision as of 14:11, 22 November 2022
| “ | My last expedition through the Pyramid of Sart was almost the end of me. That place is filled with old mechanical boobytraps! | ” |
| ~ Indy |
Pyramid of Sart is a dungeon area located in Dawn Valley. Deep within the pyramid the third titan, Sart, the Bender of Sands, can be found.
Description
In Pyramid of Sart, Coromons can be found hiding in sandy patches over the floor. Many members of Lux Solis research force are found exploring the pyramid, some even willing to battle. The player must watch out for booby traps and dart traps spread across all floors of the pyramid.
Checkpoints: F1 / F2 / F3 / F4 / F5 / F6 / F7
Puzzle Solutions & Strategies
Sliding Wall
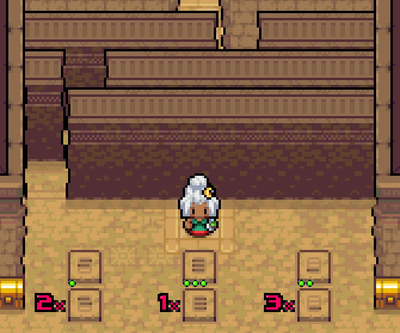
Throughout the dungeon there will be several sliding wall puzzles, the first being on F4. The player must step on pressure plates which activates mechanisms that moves the walls, with the objective of creating a path to traverse.
The pressure plates have small indicators as to which direction the mechanism will move the walls, clockwise or counterclockwise, and which walls are being moved. Each step will cycle 1 tile in the designated direction.
F4
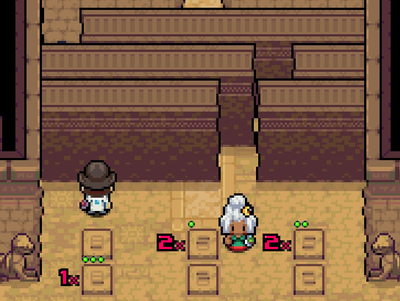
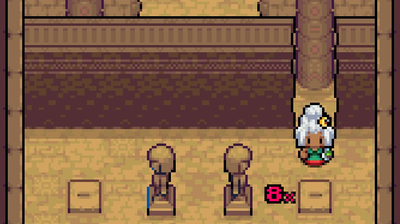
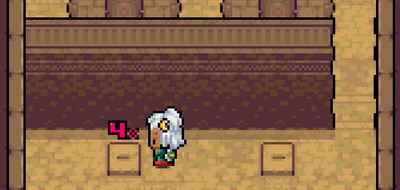
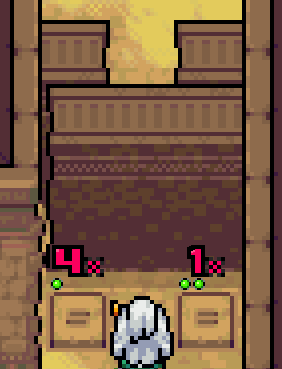
The guide instructions are as follows: the order in which each plate must be stepped is marked with a green orb at the top of the plate and beside the plate is the number of cycles needed to be stepped.
In this scenario, we start with the middle plate and step on it for 2 cycles, next the plate on the right for 2 cycles and finally the plate on the left for 1 cycle.
F5
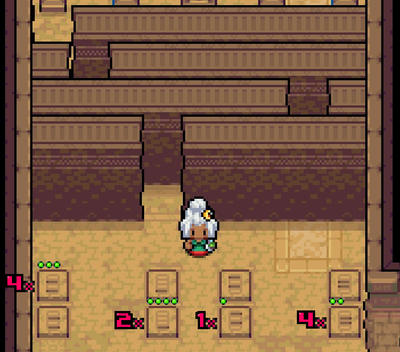
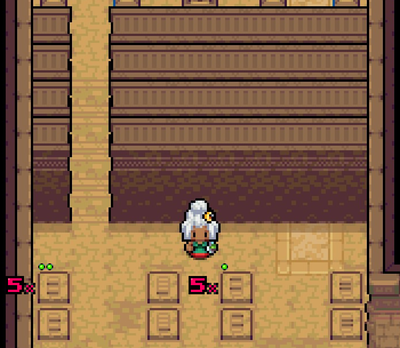
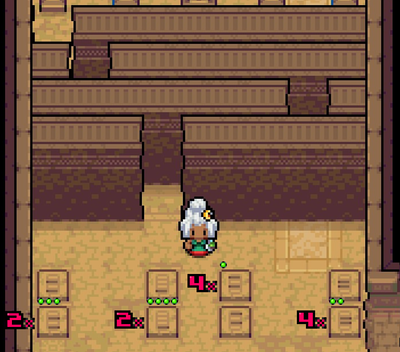
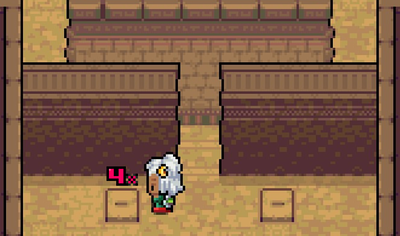
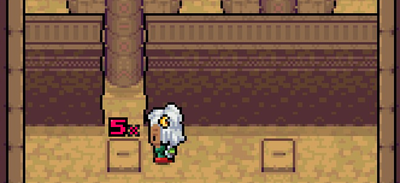
In this floor, the first puzzle contains treasures to be collected at the left side, follow the instructions on the left image to reach it. Then the one to the right to progress.
A more direct path ignoring the treasure can be found bellow.
Concluding this next puzzle leads to the fork section.
F5 Forks
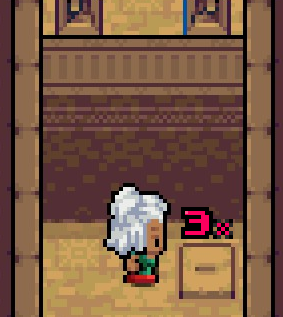
This next puzzle is more straightforward, consists of various pairs of plates controlling a single wall, only one route leads to the exit. Treasures and Coromons can be found at other routes.
- Fastest Route:
F6
Pressure Plates & Darts (F4)
Darts will fly towards the player as you step on the plates.
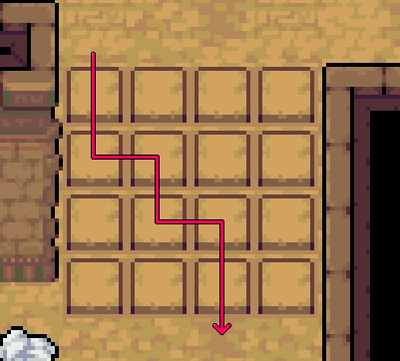
The first row will always shoot directly at the position where the plate is located, following a pattern from right to left on each next section going forward. The solution is to start from the leftmost and follow the pattern on the image, this is a simple and safe method.
It is possible cross from the right side, but requires faster reaction time to move quickly before darts can reach (Get as close to the wall approaching the plate from the right, hold left while running and press down at correct intervals to move diagonally towards the safe gap).
At the second set of plates, do exactly the same pattern as above.
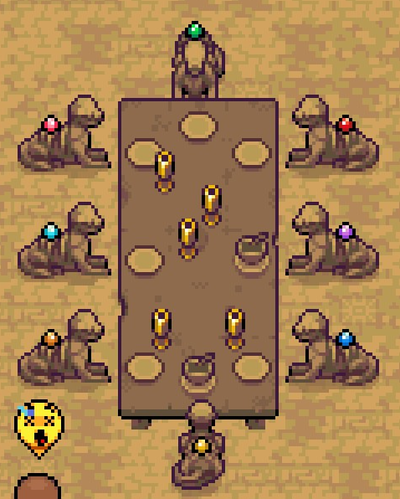
Skuldra Statues (F4)
There are several Skuldra statues with gems attached to them, the player must inspect each statue to acquire hints and reorder the gems accordingly.
Hints:
- Orange wants Red as immediate neighbour.
- Yellow wants to face Magenta.
- Magenta does not want Green as immediate neighbour.
- Turquoise wants to face Blue.
- Red wants to sit at a corner.
- Green wants to face Red.
- Blue wants Orange as immediate neighbour.
- Purple does not want to sit at a corner.
Starting with hints about Red, this is one of the possible achievable solutions:
| Yellow | ||
| Green | Red | |
| Purple | Orange | |
| Turquoise | Blue | |
| Magenta |
Coromon Located Here
| Coromon | Level | Rarity | Area | Double Battle |
|---|---|---|---|---|
| 28-30 | Common | F1 | ||
| 28-33 | Common | F1 / F8 / F9 / F10 | ||
| 24-27 | Common | F1 | ||
| 27-31 | Common | F1 / F5 | ||
| 26-33 | Uncommon | F1 / F2 / F3 / F4 / F5 / F6 / F7 / F8 / F9 / F10 | ||
| 27-28 | Common | F2 | ||
| 27-33 | Rare | F2 / F6 / F7 | ||
| 27-32 | Common | F2 | ||
| 26-32 | Common | F3 / F4 / F5 | ||
| 22-33 | Uncommon | F3 / F8 / F9 / F10 | F3 | |
| 26-33 | Uncommon | F3 / F4 / F5 / F6 / F8 / F9 / F10 | ||
| 30 | Common | F3 | ||
| 31-33 | Common | F4 | ||
| 24-25 | Uncommon | F3 | ||
| 21-33 | Uncommon | F7 | F5 | |
| 30-32 | Rare | F6 | ||
| 25-27 | Common | F7 |
Items
| Area | Item | Location |
|---|---|---|
| F1 | Gold chest in the middle | |
| Statue at top-left corner | ||
| Statue with red gem to the left of the stairs | ||
| F2 | Gold chest near statues on the right side of entrance | |
| Pillar above the gold chest | ||
| Wall pillar between the dart traps | ||
| Pair of small blue vases near Skuldra statues | ||
| Small blue vase near floor hole at bottom-left | ||
| Small vase beside the floor hole at bottom-left | ||
| Small blue vase at bottom-right | ||
| Gold chest at bottom-right | ||
| F3 | Gold chest south of entrance | |
| Pillar beside Beatrice | ||
| Small blue vase between dart traps to the south | ||
| Small blue vase left of stairs to F4 | ||
| Open small blue vase left of stairs to F4 | ||
| F4 | Gold chest at bottom-right corner | |
| Large brown vase beside the gold chest | ||
| Gold chest near Skuldra statues | ||
| Solve a quick slide wall puzzle to reveal a gold chest | ||
| Pillar top-left corner on Skuldra statue puzzle room | ||
| Solve the Skuldra Statue Puzzle | ||
| Gold chest past the dart traps | ||
| F5 | Gold chest before wall puzzle | |
| Solve wall puzzle opening the path to the left to reach three gold chests | ||
| Solve wall puzzle opening the path to the right to find two gold chests | ||
| Pair of small blue vases in the rightmost path of the final wall puzzle | ||
| Small open vase beside south wall in the same room as above | ||
| Small blue vase beside east wall in the same room as above | ||
| Red gem statue in the middle path to the north | ||
| Gold chest at top-right | ||
| Small vase in the leftmost path | ||
| F6 | Gold chest beside two Skuldra statues | |
| Gold chest past the pressure plates on left side | ||
| F7 | Gold chest at bottom-left corner | |
| Gold chest at bottom-left corner | ||
| Top pillar near holes | ||
| Large brown vase beside right wall | ||
| Gold chest at top-right corner | ||
| Large brown vase at top-left corner | ||
| F8 | Gold chest at top-right corner | |
| Top-right large blue vase | ||
| Top-left large brown vase | ||
| Bottom-left large blue vase | ||
| F9 | Gold chest at top-right corner | |
| Bottom-right statue | ||
| F10 | Gold chest in the room | |
| Summit | Defeat Titan Sart |
- Article stubs
- Locations

