Pawbury: Difference between revisions
Jump to navigation
Jump to search
Mirageionova (talk | contribs) m (ES interwiki added) |
PoppThePoop (talk | contribs) |
||
| (57 intermediate revisions by 8 users not shown) | |||
| Line 1: | Line 1: | ||
[[File:FurclawMansionOutside.png|thumb|'''Furclaw Mansion''' as seen from the outside.]] |
|||
{{stub}} <!-- The town of Pawbury is an area behind the release date of the official game like the Soggy Swamp route, with the town housing the second titan Illuginn. I, Flint Is Weird just decided to add them music to make the town tease more. --> |
{{stub}} <!-- The town of Pawbury is an area behind the release date of the official game like the Soggy Swamp route, with the town housing the second titan Illuginn. I, Flint Is Weird just decided to add them music to make the town tease more. --> |
||
{{Quote |
{{Quote |
||
| Line 17: | Line 19: | ||
==Coromon Located Here== |
==Coromon Located Here== |
||
<small>Grass B is found at the Cemetery</small> |
|||
{| class="wikitable sortable" style="text-align:left; width: 100%" |
{| class="wikitable sortable" style="text-align:left; width: 100%" |
||
! scope="col" style="text-align:center;" |Coromon |
! scope="col" style="text-align:center; width:15%" |Coromon |
||
! scope="col" style="text-align:center;" |Level |
! scope="col" style="text-align:center; width:15%" |Level |
||
! scope="col" style="text-align:center;" |Rarity |
! scope="col" style="text-align:center; width:20%" |Rarity |
||
! scope="col" style="text-align:center; width: |
! scope="col" style="text-align:center; width:20%" |Area |
||
! scope="col" style="text-align:center; width:15%" |Double Battle |
! scope="col" style="text-align:center; width:15%" |Double Battle |
||
! scope="col" style="text-align:center; width:15%" |Triple Battle |
! scope="col" style="text-align:center; width:15%" |Triple Battle |
||
| Line 28: | Line 31: | ||
| style="text-align:center;" |16-23 |
| style="text-align:center;" |16-23 |
||
| style="text-align:center;" |Common |
| style="text-align:center;" |Common |
||
| style="text-align:center;" |<span style="color: |
| style="text-align:center;" |<span style="color:#3FC25AFF;">B</span> |
||
| style="text-align:center;" |<span style="color: |
| style="text-align:center;" |<span style="color:#3FC25AFF;">B</span> |
||
| style="text-align:center;" | |
| style="text-align:center;" | ❌ |
||
|- |
|- |
||
| data-sort-value="Gildwing" |{{A|Gildwing}} |
| data-sort-value="Gildwing" |{{A|Gildwing}} |
||
| style="text-align:center;" |18-22 |
| style="text-align:center;" |18-22 |
||
| style="text-align:center;" |Common |
| style="text-align:center;" |Common |
||
| style="text-align:center;" |<span style="color: |
| style="text-align:center;" |<span style="color:#3FC25AFF;">B</span> |
||
| style="text-align:center;" | |
| style="text-align:center;" | ❌ |
||
| style="text-align:center;" | |
| style="text-align:center;" | ❌ |
||
|- |
|- |
||
| data-sort-value="Armadil" |{{A|Armadil}} |
| data-sort-value="Armadil" |{{A|Armadil}} |
||
| style="text-align:center;" |18-22 |
| style="text-align:center;" |18-22 |
||
| style="text-align:center;" |Common |
| style="text-align:center;" |Common |
||
| style="text-align:center;" |<span style="color: |
| style="text-align:center;" |<span style="color:#3FC25AFF;">A</span> |
||
| style="text-align:center;" | |
| style="text-align:center;" | ❌ |
||
| style="text-align:center;" | |
| style="text-align:center;" | ❌ |
||
|- |
|- |
||
| data-sort-value="Lunarpup" |{{A|Lunarpup}} |
| data-sort-value="Lunarpup" |{{A|Lunarpup}} |
||
| style="text-align:center;" |17-20 |
| style="text-align:center;" |17-20 |
||
| style="text-align:center;" |Common |
| style="text-align:center;" |Common |
||
| style="text-align:center;" |<span style="color: |
| style="text-align:center;" |<span style="color:#3FC25AFF;">A</span> |
||
| style="text-align:center;" | |
| style="text-align:center;" | ❌ |
||
| style="text-align:center;" | |
| style="text-align:center;" | ❌ |
||
|- |
|- |
||
| data-sort-value="Purrgy" |{{A|Purrgy}} |
| data-sort-value="Purrgy" |{{A|Purrgy}} |
||
| style="text-align:center;" |8-22 |
| style="text-align:center;" |8-22 |
||
| style="text-align:center;" |Common |
| style="text-align:center;" |Common |
||
| style="text-align:center;" |<span style="color: |
| style="text-align:center;" |<span style="color:#3FC25AFF;">A</span> |
||
| style="text-align:center;" |<span style="color: |
| style="text-align:center;" |<span style="color:#3FC25AFF;">A</span> |
||
| style="text-align:center;" |<span style="color: |
| style="text-align:center;" |<span style="color:#3FC25AFF;">A</span> |
||
|- |
|- |
||
| data-sort-value="Ghinx" |{{A|Ghinx}} |
| data-sort-value="Ghinx" |{{A|Ghinx}} |
||
| style="text-align:center;" |20-22 |
| style="text-align:center;" |20-22 |
||
| style="text-align:center;" |Common |
| style="text-align:center;" |Common |
||
| style="text-align:center;" |<span style="color: |
| style="text-align:center;" |<span style="color:#3FC25AFF;">A</span> |
||
| style="text-align:center;" | |
| style="text-align:center;" | ❌ |
||
| style="text-align:center;" |<span style="color: |
| style="text-align:center;" |<span style="color:#3FC25AFF;">A</span> |
||
|- |
|- |
||
| data-sort-value="Squidly" |{{A|Squidly}} |
| data-sort-value="Squidly" |{{A|Squidly}} |
||
| style="text-align:center;" |18-23 |
| style="text-align:center;" |18-23 |
||
| style="text-align:center;" |Common |
| style="text-align:center;" |Common |
||
| style="text-align:center;" |<span style="color: |
| style="text-align:center;" |<span style="color:#3FC25AFF;">B</span> - <span style="color:#568e90">Water</span> |
||
| style="text-align:center;" | |
| style="text-align:center;" | ❌ |
||
| style="text-align:center;" | |
| style="text-align:center;" | ❌ |
||
|- |
|||
| data-sort-value="Droople" |{{A|Droople}} |
|||
| scope="col" style="text-align:center;" |17-20 |
|||
| style="text-align:center;" |Common |
|||
| style="text-align:center;" |<span style="color:#568e90">Water</span> |
|||
| style="text-align:center;" | ❌ |
|||
| style="text-align:center;" | ❌ |
|||
|- |
|||
| data-sort-value="Fibio" |{{A|Fibio}} |
|||
| scope="col" style="text-align:center;" |19-21 |
|||
| style="text-align:center;" |Common |
|||
| style="text-align:center;" |<span style="color:#568e90">Water</span> |
|||
| style="text-align:center;" | ❌ |
|||
| style="text-align:center;" | ❌ |
|||
|- |
|||
| data-sort-value="Lemobi" |{{A|Lemobi}} |
|||
| scope="col" style="text-align:center;" |16-18 |
|||
| style="text-align:center;" |Uncommon |
|||
| style="text-align:center;" |<span style="color:#3FC25AFF;">A</span> |
|||
| style="text-align:center;" | ❌ |
|||
| style="text-align:center;" | ❌ |
|||
|- |
|||
|} |
|} |
||
<!--- Removed until template is updated |
|||
==Encounter Rates== |
==Encounter Rates== |
||
{| class="article-table" width="100%" style="text-align:center;" |
{| class="article-table" width="100%" style="text-align:center;" |
||
! Zone |
! Zone |
||
! colspan=" |
! colspan="12" style="text-align:center;" | Rates |
||
|- |
|- |
||
| <span style="color:#3FC25AFF;">Grass A</span> |
|||
| A |
|||
| <abbr title="Rates based on 100 consecutive battles.">20.00%</abbr> {{EncounterRate|Purrgy|Woodlow Harbor|E}} {{EncounterRate|Purrgy|Woodlow Harbor|E}} |
|||
| {{EncounterRate|Armadil|Pawbury|A}} |
|||
| <abbr title="Rates based on 100 consecutive battles.">10.00%</abbr> {{EncounterRate|Purrgy|Woodlow Harbor|E}} {{EncounterRate|Ghinx|Woodlow Harbor|E}} {{EncounterRate|Purrgy|Woodlow Harbor|E}} |
|||
| {{EncounterRate|Lunarpup|Pawbury|A}} |
|||
| <abbr title="Rates based on 100 consecutive battles.">30.00%</abbr> {{EncounterRate|Armadil|Woodlow Harbor|E}} |
|||
| {{EncounterRate|Purrgy|Pawbury|A}} |
|||
| <abbr title="Rates based on 100 consecutive battles.">15.00%</abbr> {{EncounterRate|Lunarpup|Woodlow Harbor|E}} |
|||
| {{EncounterRate|Ghinx|Pawbury|A}} |
|||
| <abbr title="Rates based on 100 consecutive battles.">25.00%</abbr> {{EncounterRate|Lemobi|Woodlow Harbor|E}} |
|||
| |
|||
| <!-- Silquill --> |
|||
| |
|||
| <!-- Silquill double battle --> |
|||
| |
|||
| <!-- Gildwing --> |
|||
| <!-- Squidly --> |
|||
| <!-- Fibio --> |
|||
| <!-- Droople --> |
|||
|- |
|- |
||
| <span style="color:#3FC25AFF;">Grass B</span> |
|||
| B |
|||
| <!-- Purrgy double battle --> |
|||
| |
|||
| <!-- Purrgy and Ghinx triple battle --> |
|||
| |
|||
| <!-- Armadil --> |
|||
| |
|||
| <!-- Lunarpup --> |
|||
| |
|||
| <!-- Lemobi --> |
|||
| {{EncounterRate|Silquill|Pawbury|B}} |
|||
| <abbr title="Rates based on 100 consecutive battles.">30.00%</abbr> {{EncounterRate|Silquill|Woodlow Harbor|E}} |
|||
| {{EncounterRate|Gildwing|Pawbury|B}} |
|||
| <abbr title="Rates based on 100 consecutive battles.">20.00%</abbr> {{EncounterRate|Silquill|Woodlow Harbor|E}} {{EncounterRate|Silquill|Woodlow Harbor|E}} |
|||
| {{EncounterRate|Squidly|Pawbury|B}} |
|||
| <abbr title="Rates based on 100 consecutive battles.">30.00%</abbr> {{EncounterRate|Gildwing|Woodlow Harbor|E}} |
|||
|} ---> |
|||
| <abbr title="Rates based on 100 consecutive battles.">20.00%</abbr> {{EncounterRate|Squidly|Woodlow Harbor|E}} |
|||
| <!-- Fibio --> |
|||
| <!-- Droople --> |
|||
|- |
|||
| <span style="color:#568e90">Water</span> |
|||
| <!-- Purrgy double battle --> |
|||
| <!-- Purrgy and Ghinx triple battle --> |
|||
| <!-- Armadil --> |
|||
| <!-- Lunarpup --> |
|||
| <!-- Lemobi --> |
|||
| <!-- Silquill --> |
|||
| <!-- Silquill double battle --> |
|||
| <!-- Gildwing -->| |
|||
| <abbr title="Rates based on 100 consecutive battles.">20.00%</abbr> {{EncounterRate|Squidly|Woodlow Harbor|E}} |
|||
| <abbr title="Rates based on 100 consecutive battles.">40.00%</abbr> {{EncounterRate|Fibio|Woodlow Harbor|E}} |
|||
| <abbr title="Rates based on 100 consecutive battles.">40.00%</abbr> {{EncounterRate|Droople|Woodlow Harbor|E}} |
|||
|- |
|||
|} |
|||
==Rates for fruits held during battles== |
|||
{| class="article-table" width="100%" style="text-align:center;" |
|||
! Zone |
|||
! colspan="12" style="text-align:center;" | Rates for fruits held during battles |
|||
|- |
|||
| <span style="color:#3FC25AFF;">Grass A</span> |
|||
| <abbr title="Rates based on 100 consecutive battles.">5.00%</abbr> {{EncounterRate|Purrgy|Woodlow Harbor|E}} [[File:FRUIT_JUBA.png|20px]] {{EncounterRate|Purrgy|Woodlow Harbor|E}} [[File:FRUIT_JUBA.png|20px]] |
|||
| <abbr title="Rates based on 100 consecutive battles.">20.00%</abbr> {{EncounterRate|Purrgy|Woodlow Harbor|E}} [[File:FRUIT_CURE_CONDITION_CURSE.png|20px]] [[File:FRUIT_CURE_CONDITION_FREEZE.png|20px]] {{EncounterRate|Ghinx|Woodlow Harbor|E}} [[File:FRUIT_CURE_CONDITION_CURSE.png|20px]] [[File:FRUIT_CURE_CONDITION_FREEZE.png|20px]] {{EncounterRate|Purrgy|Woodlow Harbor|E}} [[File:FRUIT_CURE_CONDITION_CURSE.png|20px]] [[File:FRUIT_CURE_CONDITION_FREEZE.png|20px]] |
|||
| <abbr title="Rates based on 100 consecutive battles.">10.00%</abbr> {{EncounterRate|Armadil|Woodlow Harbor|E}} [[File:FRUIT_JUBA.png|20px]] [[File:FRUIT_SKILL_POWER_BOOST_ELECTRIC.png|20px]] [[File:FRUIT_CURE_CONDITION_HAZY.png|20px]] |
|||
| <abbr title="Rates based on 100 consecutive battles.">6.67%</abbr> {{EncounterRate|Lunarpup|Woodlow Harbor|E}} [[File:FRUIT_CURE_CONDITION_POISON.png|20px]] |
|||
| <abbr title="Rates based on 100 consecutive battles.">8.00%</abbr> {{EncounterRate|Lemobi|Woodlow Harbor|E}} [[File:FRUIT_RECOVER_ENERGY.png|20px]] [[File:FRUIT_CURE_CONDITION_CURSE.png|20px]] |
|||
| <!-- Silquill --> |
|||
| <!-- Silquill double battle --> |
|||
| <!-- Gildwing --> |
|||
| <!-- Squidly --> |
|||
| <!-- Fibio --> |
|||
| <!-- Droople --> |
|||
|- |
|||
| <span style="color:#3FC25AFF;">Grass B</span> |
|||
| <!-- Purrgy double battle --> |
|||
| <!-- Purrgy and Ghinx triple battle --> |
|||
| <!-- Armadil --> |
|||
| <!-- Lunarpup --> |
|||
| <!-- Lemobi --> |
|||
| <abbr title="Rates based on 100 consecutive battles.">6.67%</abbr> {{EncounterRate|Silquill|Woodlow Harbor|E}} [[File:FRUIT_RECOVER_ENERGY.png|20px]] |
|||
| <abbr title="Rates based on 100 consecutive battles.">5.00%</abbr> {{EncounterRate|Silquill|Woodlow Harbor|E}} [[File:FRUIT_RECOVER_HEALTH_RISK_CONDITION.png|20px]] {{EncounterRate|Silquill|Woodlow Harbor|E}} [[File:FRUIT_RECOVER_HEALTH_RISK_CONDITION.png|20px]] |
|||
| <abbr title="Rates based on 100 consecutive battles.">0.00%</abbr> {{EncounterRate|Gildwing|Woodlow Harbor|E}} |
|||
| <abbr title="Rates based on 100 consecutive battles.">5.00%</abbr> {{EncounterRate|Squidly|Woodlow Harbor|E}} [[File:FRUIT_RECOVER_HEALTH_RISK_CONDITION.png|20px]] |
|||
| <!-- Fibio --> |
|||
| <!-- Droople --> |
|||
|- |
|||
| <span style="color:#568e90">Water</span> |
|||
| <!-- Purrgy double battle --> |
|||
| <!-- Purrgy and Ghinx triple battle --> |
|||
| <!-- Armadil --> |
|||
| <!-- Lunarpup --> |
|||
| <!-- Lemobi --> |
|||
| <!-- Silquill --> |
|||
| <!-- Silquill double battle --> |
|||
| <!-- Gildwing -->| |
|||
| <abbr title="Rates based on 100 consecutive battles.">0.00%</abbr> {{EncounterRate|Squidly|Woodlow Harbor|E}} |
|||
| <abbr title="Rates based on 100 consecutive battles.">7.50%</abbr> {{EncounterRate|Fibio|Woodlow Harbor|E}} [[File:FRUIT_RECOVER_HEALTH_RISK_CONDITION.png|20px]] [[File:FRUIT_RECOVER_ENERGY.png|20px]] [[File:FRUIT_SKILL_POWER_BOOST_FIRE.png|20px]] |
|||
| <abbr title="Rates based on 100 consecutive battles.">7.50%</abbr> {{EncounterRate|Droople|Woodlow Harbor|E}} [[File:FRUIT_CURE_CONDITION_HAZY.png|20px]] [[File:FRUIT_CURE_CONDITION_DROWSY.png|20px]] [[File:FRUIT_JUBA.png|20px]] |
|||
|- |
|||
|} |
|||
==Items== |
==Items== |
||
| Line 105: | Line 198: | ||
! scope="col" style="text-align:center;" |Location |
! scope="col" style="text-align:center;" |Location |
||
|- |
|- |
||
| rowspan=" |
| rowspan="17" | Pawbury |
||
| style="vertical-align:bottom;text-align:left;" | {{I|Gold}} x 600 |
|||
| style="vertical-align:bottom;" | Statue beside Trainer Hub |
|||
|- |
|||
| style="vertical-align:bottom;text-align:left;" | {{I|Physical Cake}} x 1 |
|||
| style="vertical-align:bottom;" | Small rock outside Furclaw Manor near Basement entrance |
|||
|- |
|||
| style="vertical-align:bottom;text-align:left;" | {{I|HP Cake (S)}} x 1 |
| style="vertical-align:bottom;text-align:left;" | {{I|HP Cake (S)}} x 1 |
||
| style="vertical-align:bottom;" | Statue at south-east corner of Furclaw Manor yard (Req. [[Module|Burn Module]]) |
| style="vertical-align:bottom;" | Statue at south-east corner of Furclaw Manor yard (Req. [[File:Burn.png|20px]] [[Module|Burn Module]]) |
||
|- |
|||
| style="vertical-align:bottom;text-align:left;" | {{I|Skill Flash 73}} x 1 |
|||
| style="vertical-align:bottom;" | Chest beside Furclaw Manor (Req. [[File:Burn.png|20px]] [[Module|Burn Module]]) |
|||
|- |
|||
| style="vertical-align:bottom;text-align:left;" | {{I|Pepper Scent}} x 1 |
|||
| style="vertical-align:bottom;" | Silver chest at south-west of the manor entrance. |
|||
|- |
|||
| style="vertical-align:bottom;text-align:left;" | {{I|XP Chip}} x 1 |
|||
| style="vertical-align:bottom;" | Behind large statue in front of Monastery of Illuginn |
|||
|- |
|- |
||
| style="vertical-align:bottom;text-align:left;" | {{I|Gold}} x420 |
| style="vertical-align:bottom;text-align:left;" | {{I|Gold}} x420 |
||
| style="vertical-align:bottom;" | Chest behind hedges of Furclaw Manor yard (Req. [[Module|Burn Module]]) |
| style="vertical-align:bottom;" | Chest behind hedges of Furclaw Manor yard (Req. [[File:Burn.png|20px]] [[Module|Burn Module]]) |
||
|- |
|- |
||
| style="vertical-align:bottom;text-align:left;" | {{I|Spooky Spinner}} x3 |
| style="vertical-align:bottom;text-align:left;" | {{I|Spooky Spinner}} x3 |
||
| style="vertical-align:bottom;" | Statue at north-west corner of Furclaw Manor yard (Req. [[Module|Burn Module]]) |
| style="vertical-align:bottom;" | Statue at north-west corner of Furclaw Manor yard (Req. [[File:Burn.png|20px]] [[Module|Burn Module]]) |
||
|- |
|- |
||
| style="vertical-align:bottom;text-align:left;" | {{I|Silver Spinner}} x1 |
| style="vertical-align:bottom;text-align:left;" | {{I|Silver Spinner}} x1 |
||
| style="vertical-align:bottom;" | Statue east of Monastery (Req. [[Module|Burn Module]]) |
| style="vertical-align:bottom;" | Statue east of Monastery (Req. [[File:Burn.png|20px]] [[Module|Burn Module]]) |
||
|- |
|- |
||
| style="vertical-align:bottom;text-align:left;" | {{I|Spinner}} x2 |
| style="vertical-align:bottom;text-align:left;" | {{I|Spinner}} x2 |
||
| style="vertical-align:bottom;" | Statue west of Monastery (Req. [[Module|Burn Module]]) |
| style="vertical-align:bottom;" | Statue west of Monastery (Req. [[File:Burn.png|20px]] [[Module|Burn Module]]) |
||
|- |
|- |
||
| style="vertical-align:bottom;text-align:left;" | {{I|Ground Spinner}} x3 |
| style="vertical-align:bottom;text-align:left;" | {{I|Ground Spinner}} x3 |
||
| Line 125: | Line 233: | ||
|- |
|- |
||
| style="vertical-align:bottom;text-align:left;" | {{I|Dream Spinner}} x2 |
| style="vertical-align:bottom;text-align:left;" | {{I|Dream Spinner}} x2 |
||
| style="vertical-align:bottom;" | Chest beside Shop (Req. [[Module|Burn Module]]) |
| style="vertical-align:bottom;" | Chest beside Shop (Req. [[File:Burn.png|20px]] [[Module|Burn Module]]) |
||
|- |
|- |
||
| style="vertical-align:bottom;text-align:left;" | {{I|Skill Flash 5}} x1 |
| style="vertical-align:bottom;text-align:left;" | {{I|Skill Flash 5}} x1 |
||
| style="vertical-align:bottom;" | Chest inside [[Witch's House|Sabrina's House]] (Req. [[Module|Burn Module]]) |
| style="vertical-align:bottom;" | Chest inside [[Witch's House|Sabrina's House]] (Req. [[File:Burn.png|20px]] [[Module|Burn Module]]) |
||
|- |
|- |
||
| style="vertical-align:bottom;text-align:left;" | {{I|Witch Hat |
| style="vertical-align:bottom;text-align:left;" | {{I|Witch Hat}} x1 |
||
| rowspan="2" style="vertical-align:center;" | Golden chest inside [[Witch |
| rowspan="2" style="vertical-align:center;" | Golden chest inside [[Witch's House]] (Req. [[File:Burn.png|20px]] [[Module|Burn Module]]) |
||
|- |
|- |
||
| style="vertical-align:bottom;text-align:left;" | {{I|Fungus}} x10 |
| style="vertical-align:bottom;text-align:left;" | {{I|Fungus}} x10 |
||
|- |
|- |
||
| style="vertical-align:bottom;text-align:left;" | {{I|gold}} x5000 |
|||
| rowspan="2" | Furclaw Manor |
|||
| rowspan="2" style="vertical-align:center;" | Chest hidden below the trees next to the boat (Req. {{I|LuxBoard}}) |
|||
|- |
|||
| style="vertical-align:bottom;text-align:left;" | {{I|Skill Flash 8}} x1 |
|||
|- |
|||
| rowspan="1" | Community Sculpting Center |
|||
| style="vertical-align:bottom;text-align:left;" | {{I|Unip Fruit}} x1 |
|||
| style="vertical-align:bottom;" | Chest in room left side of entrance |
|||
|- |
|||
| rowspan="1" | Trainer Hub |
|||
| style="vertical-align:bottom;text-align:left;" | {{I|Trick Spinner}} x1 |
|||
| style="vertical-align:bottom;" | Chest in 2nd Floor |
|||
|- |
|||
| rowspan="1" | Shop |
|||
| style="vertical-align:bottom;text-align:left;" | {{I|Special Cake}} x1 |
|||
| style="vertical-align:bottom;" | Plant in the right side of entrance |
|||
|- |
|||
| rowspan="19" | Furclaw Manor |
|||
| style="vertical-align:bottom;text-align:left;" | {{I|Juba Fruit}} x1 |
| style="vertical-align:bottom;text-align:left;" | {{I|Juba Fruit}} x1 |
||
| style="vertical-align:bottom;" | Barrel in basement room |
| style="vertical-align:bottom;" | Barrel in basement room |
||
|- |
|||
| style="vertical-align:bottom;text-align:left;" | {{I|Spooky Spinner}} x2 |
|||
| style="vertical-align:bottom;" | Chest in basement room |
|||
|- |
|||
| style="vertical-align:bottom;text-align:left;" | {{I|Juba Fruit}} x1 |
|||
| style="vertical-align:bottom;" | Barrel beside bookshelf in Puzzle room |
|||
|- |
|||
| style="vertical-align:bottom;text-align:left;" | {{I|Level Cake}} x1 |
|||
| style="vertical-align:bottom;" | Glass case in Puzzle room |
|||
|- |
|||
| style="vertical-align:bottom;text-align:left;" | {{I|Heal Spinner}} x1 |
|||
| style="vertical-align:bottom;" | Chest in Puzzle room |
|||
|- |
|- |
||
| style="vertical-align:bottom;text-align:left;" | {{I|Skill Flash 70}} x1 |
| style="vertical-align:bottom;text-align:left;" | {{I|Skill Flash 70}} x1 |
||
| style="vertical-align:bottom;" | Clock at 2nd floor hall |
| style="vertical-align:bottom;" | Clock at 2nd floor hall |
||
|- |
|||
| style="vertical-align:bottom;text-align:left;" | {{I|Duria Fruit}} x1 |
|||
| style="vertical-align:bottom;" | Oven in Kitchen |
|||
|- |
|||
| style="vertical-align:bottom;text-align:left;" | {{I|Toxic Scent}} x1 |
|||
| style="vertical-align:bottom;" | Trashcan in Kitchen |
|||
|- |
|||
| style="vertical-align:bottom;text-align:left;" | {{I|Defense Cake (S)}} x1 |
|||
| style="vertical-align:bottom;" | Table/Pedestal in First Floor Entrance Hall |
|||
|- |
|||
| style="vertical-align:bottom;text-align:left;" | {{I|Spinner}} x1 |
|||
| style="vertical-align:bottom;" | Stepladder/Cardboard Box in 1st Floor Library |
|||
|- |
|||
| style="vertical-align:bottom;text-align:left;" | {{I|HP Cake (S)}} x1 |
|||
| style="vertical-align:bottom;" | Full Male Statue Left of the Couch in 1st Floor Gallery |
|||
|- |
|||
| style="vertical-align:bottom;text-align:left;" | {{I|SP Cake (S)}} x1 |
|||
| style="vertical-align:bottom;" | Full Female Statue Right of the Couch in 1st Floor Gallery |
|||
|- |
|||
| style="vertical-align:bottom;text-align:left;" | {{I|Ether Scent}} x3 |
|||
| style="vertical-align:bottom;" | Chest in 2nd Floor Bottom Right Bedroom |
|||
|- |
|||
| style="vertical-align:bottom;text-align:left;" | {{I|Golden Spinner}} x1 |
|||
| style="vertical-align:bottom;" | Furniture in basement room, right next to a Purrgy. |
|||
|- |
|||
| style="vertical-align:bottom;text-align:left;" | {{I|Top Hat}} x1 |
|||
| style="vertical-align:bottom;" | Silver Chest on a table in Bottom Left Sitting Room |
|||
|- |
|||
| style="vertical-align:bottom;text-align:left;" | {{I|Coupon 75%}} x1 |
|||
| style="vertical-align:bottom;" | Gold Chest on a table in Top Right Bedroom |
|||
|- |
|||
| style="vertical-align:bottom;text-align:left;" | {{I|Unip Fruit}} x3 |
|||
| rowspan="3" style="vertical-align:center;" | Gold Chest in 2nd Floor Bottom Left Sitting Room |
|||
|- |
|||
| style="vertical-align:bottom;text-align:left;" | {{I|Cham Fruit}} x3 |
|||
|- |
|||
| style="vertical-align:bottom;text-align:left;" | {{I|Tama Fruit}} x3 |
|||
|- |
|||
| rowspan="2" | Cemetery |
|||
| style="vertical-align:bottom;text-align:left;" | {{I|Escape Flash}} x1 |
|||
| style="vertical-align:bottom;" | Tombstone in 2nd from the left on the 2nd row |
|||
|- |
|||
| style="vertical-align:bottom;text-align:left;" | {{I|Heal Spinner}} x1 |
|||
| style="vertical-align:bottom;" | Chest beside grass |
|||
|- |
|||
| rowspan="1" | Hyperloop |
|||
| style="vertical-align:bottom;text-align:left;" | {{I|Sopo Fruit}} x1 |
|||
| style="vertical-align:bottom;" | Plant right side of entrance |
|||
|- |
|||
|} |
|||
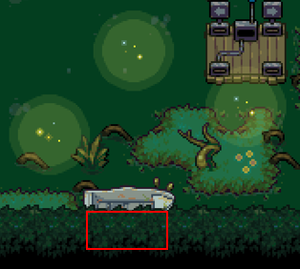
[[File:PawburyHiddenChest.png|thumb|left|Chest hidden below the trees next to the boat in Pawbury where {{gold|5000}} and {{I|Skill Flash 8}} are hidden.]] |
|||
</br></br></br></br></br></br></br></br></br></br></br></br></br></br></br></br> |
|||
==Hidden Gems/Items location== |
|||
{| class="article-table mw-collapsible" border="0" cellspacing="1" cellpadding="1" width="100%"; |
|||
! colspan="3"| |
|||
|- |
|||
! scope="col" style="text-align:center; width:25%"|Location |
|||
! scope="col" style="text-align:center;"|[[File:GEM_RED_1.png|25px]]Item |
|||
! scope="col" style="text-align:center; width:15%"|{{Gold}} Sell price |
|||
|- |
|||
! colspan="3" style="text-align:center; font-weight:bold; background-color:#292330;" | Pawbury |
|||
|- |
|||
|style="text-align:center"|[[File:Pawbury_gem1.png|150px]] |
|||
|style="text-align:center"|{{I|GEM_BLUE_1}} |
|||
|style="text-align:center"|[[File:DRILL_SHOVEL_SILVER.png|25px]]160 / [[File:DRILL_SHOVEL_GOLD.png|25px]]120 |
|||
|- |
|||
|style="text-align:center"|[[File:Pawbury_gem2.png|150px]] |
|||
|style="text-align:center"|{{I|GEM_BLUE_1}} |
|||
|style="text-align:center"|[[File:DRILL_SHOVEL_SILVER.png|25px]]160 / [[File:DRILL_SHOVEL_GOLD.png|25px]]120 |
|||
|- |
|||
|style="text-align:center"|[[File:Pawbury_gem3.png|150px]] |
|||
|style="text-align:center"|{{I|GEM_BLUE_1}} |
|||
|style="text-align:center"|[[File:DRILL_SHOVEL_SILVER.png|25px]]160 / [[File:DRILL_SHOVEL_GOLD.png|25px]]120 |
|||
|- |
|||
|style="text-align:center"|[[File:Pawbury_gem4.png|150px]] |
|||
|style="text-align:center"|{{I|GEM_BLUE_2}} |
|||
|style="text-align:center"|[[File:DRILL_SHOVEL_SILVER.png|25px]]800 / [[File:DRILL_SHOVEL_GOLD.png|25px]]600 |
|||
|- |
|||
|style="text-align:center"|[[File:Pawbury_gem5.png|150px]] |
|||
|style="text-align:center"|{{I|GEM_BLUE_2}} |
|||
|style="text-align:center"|[[File:DRILL_SHOVEL_SILVER.png|25px]]800 / [[File:DRILL_SHOVEL_GOLD.png|25px]]600 |
|||
|- |
|||
|style="text-align:center"|[[File:Pawbury_gem6.png|150px]] |
|||
|style="text-align:center"|{{I|GEM_GREEN_1}} |
|||
|style="text-align:center"|[[File:DRILL_SHOVEL_SILVER.png|25px]]240 / [[File:DRILL_SHOVEL_GOLD.png|25px]]180 |
|||
|- |
|||
|style="text-align:center"|[[File:Pawbury_gem7.png|150px]] |
|||
|style="text-align:center"|{{I|GEM_GREEN_1}} |
|||
|style="text-align:center"|[[File:DRILL_SHOVEL_SILVER.png|25px]]240 / [[File:DRILL_SHOVEL_GOLD.png|25px]]180 |
|||
|- |
|||
|style="text-align:center"|[[File:Pawbury_gem8.png|150px]] |
|||
|style="text-align:center"|{{I|GEM_GREEN_2}} |
|||
|style="text-align:center"|[[File:DRILL_SHOVEL_SILVER.png|25px]]1200 / [[File:DRILL_SHOVEL_GOLD.png|25px]]900 |
|||
|- |
|||
|style="text-align:center"|[[File:Pawbury_gem9.png|150px]] |
|||
|style="text-align:center"|{{I|GEM_GREEN_3}} |
|||
|style="text-align:center"|[[File:DRILL_SHOVEL_SILVER.png|25px]]4800 / [[File:DRILL_SHOVEL_GOLD.png|25px]]3600 |
|||
|- |
|||
|style="text-align:center"|[[File:Pawbury_gem10.png|150px]] |
|||
|style="text-align:center"|{{I|GEM_RED_3}} |
|||
|style="text-align:center"|[[File:DRILL_SHOVEL_SILVER.png|25px]]6400 / [[File:DRILL_SHOVEL_GOLD.png|25px]]4800 |
|||
|- |
|||
|style="text-align:center"|[[File:Pawbury_gem11.png|150px]] |
|||
|style="text-align:center"|{{I|HOLD_EXTEND_WEATHER_TWILIGHT}} |
|||
|style="text-align:center"|2000 |
|||
|- |
|||
! colspan="3" style="text-align:center; font-weight:bold; background-color:#292330;" | Furclaw Manor BF1 |
|||
|- |
|||
|style="text-align:center"|[[File:FurclawManorBF1_gem1.png|150px]] |
|||
|style="text-align:center"|{{I|GEM_BLUE_3}} |
|||
|style="text-align:center"|[[File:DRILL_SHOVEL_SILVER.png|25px]]3200 / [[File:DRILL_SHOVEL_GOLD.png|25px]]2400 |
|||
|- |
|||
! colspan="3" style="text-align:center; font-weight:bold; background-color:#292330;" | Furclaw Manor |
|||
|- |
|||
|style="text-align:center"|[[File:FurclawManorF1_gem1.png|150px]] |
|||
|style="text-align:center"|{{I|GEM_BLUE_1}} |
|||
|style="text-align:center"|[[File:DRILL_SHOVEL_SILVER.png|25px]]160 / [[File:DRILL_SHOVEL_GOLD.png|25px]]120 |
|||
|- |
|||
|style="text-align:center"|[[File:FurclawManorF1_gem2.png|150px]] |
|||
|style="text-align:center"|{{I|GEM_RED_1}} |
|||
|style="text-align:center"|[[File:DRILL_SHOVEL_SILVER.png|25px]]320 / [[File:DRILL_SHOVEL_GOLD.png|25px]]240 |
|||
|- |
|||
! colspan="3" style="text-align:center; font-weight:bold; background-color:#292330;" | Furclaw Manor F1 |
|||
|- |
|||
|style="text-align:center"|[[File:FurclawManorF2_gem1.png|150px]] |
|||
|style="text-align:center"|{{I|GEM_BLUE_1}} |
|||
|style="text-align:center"|[[File:DRILL_SHOVEL_SILVER.png|25px]]160 / [[File:DRILL_SHOVEL_GOLD.png|25px]]120 |
|||
|- |
|||
|style="text-align:center"|[[File:FurclawManorF2_gem2.png|150px]] |
|||
|style="text-align:center"|{{I|GEM_BLUE_1}} |
|||
|style="text-align:center"|[[File:DRILL_SHOVEL_SILVER.png|25px]]160 / [[File:DRILL_SHOVEL_GOLD.png|25px]]120 |
|||
|- |
|||
|style="text-align:center"|[[File:FurclawManorF2_gem3.png|150px]] |
|||
|style="text-align:center"|{{I|GEM_BLUE_3}} |
|||
|style="text-align:center"|[[File:DRILL_SHOVEL_SILVER.png|25px]]3200 / [[File:DRILL_SHOVEL_GOLD.png|25px]]2400 |
|||
|- |
|||
! colspan="3" style="text-align:center; font-weight:bold; background-color:#292330;" | Mason's House |
|||
|- |
|||
|style="text-align:center"|[[File:MasonHouse_gem1.png|150px]] |
|||
|style="text-align:center"|{{I|GEM_BLUE_1}} |
|||
|style="text-align:center"|[[File:DRILL_SHOVEL_SILVER.png|25px]]160 / [[File:DRILL_SHOVEL_GOLD.png|25px]]120 |
|||
|- |
|||
! colspan="3" style="text-align:center; font-weight:bold; background-color:#292330;" | Witch's House |
|||
|- |
|||
|style="text-align:center"|[[File:WitchHouse_gem1.png|150px]] |
|||
|style="text-align:center"|{{I|GEM_RED_3}} |
|||
|style="text-align:center"|[[File:DRILL_SHOVEL_SILVER.png|25px]]6400 / [[File:DRILL_SHOVEL_GOLD.png|25px]]4800 |
|||
|- |
|||
! colspan="3" style="text-align:center; font-weight:bold; background-color:#292330;" | Pawbury Hyperloop |
|||
|- |
|||
|style="text-align:center"|[[File:PawburyHyperloop_gem1.png|150px]] |
|||
|style="text-align:center"|{{I|GEM_GREEN_2}} |
|||
|style="text-align:center"|[[File:DRILL_SHOVEL_SILVER.png|25px]]1200 / [[File:DRILL_SHOVEL_GOLD.png|25px]]900 |
|||
|- |
|||
! colspan="3" style="text-align:center; font-weight:bold; background-color:#292330;" | Trainer Hub: bottom floor |
|||
|- |
|||
|style="text-align:center"|[[File:PawburyTrainerHub_gem1.png|150px]] |
|||
|style="text-align:center"|{{I|GEM_GREEN_1}} |
|||
|style="text-align:center"|[[File:DRILL_SHOVEL_SILVER.png|25px]]240 / [[File:DRILL_SHOVEL_GOLD.png|25px]]180 |
|||
|- |
|||
! colspan="3" style="text-align:center; font-weight:bold; background-color:#292330;" | Shop |
|||
|- |
|||
|style="text-align:center"|''There are no hidden gems/items in this map.'' |
|||
|style="text-align:center"|''None'' |
|||
|style="text-align:center"|[[File:DRILL_SHOVEL_SILVER.png|25px]]''N/A'' / [[File:DRILL_SHOVEL_GOLD.png|25px]]''N/A'' |
|||
|- |
|||
|} |
|} |
||
==Shop<ref>More standard [[shop]] items become available as you progress through the game.</ref>== |
==Shop<ref>More standard [[shop]] items become available as you progress through the game.</ref>== |
||
{| class="article-table mw-collapsible" border="0" cellspacing="1" cellpadding="1" style="width: |
{| class="article-table mw-collapsible" border="0" cellspacing="1" cellpadding="1" style="width:100%; text-align:left;" |
||
! colspan="4" | |
! colspan="4" | |
||
|- |
|- |
||
! scope="col" style="width:5%; text-align:left;" |Image |
! scope="col" style="width:5%; text-align:left;" |Image |
||
! scope="col" style="width:15%; text-align:left;" |Name |
! scope="col" style="width:15%; text-align:left;" |Name |
||
! scope="col" style="width:45%; text-align:left;" |Description |
! scope="col" style="width:45%; text-align:left;" |Description |
||
! scope="col" style="width:5%; text-align:left;" |{{Gold}} Price |
! scope="col" style="width:5%; text-align:left;" |{{Gold}} Price |
||
|- |
|- |
||
! colspan="4" style="text-align:center; font-weight:bold; background-color:#292330;" |Health |
! colspan="4" style="text-align:center; font-weight:bold; background-color:#292330;" |Health |
||
| Line 330: | Line 635: | ||
| style="text-align:center;" |500 |
| style="text-align:center;" |500 |
||
|- |
|- |
||
|[[File: |
|[[File:PURRGY_NIBBLE.png|32px]] |
||
|[[Purrgy Nibbles]] |
|[[Purrgy Nibbles]] |
||
|Extra nutritious food for your Purrgy |
|Extra nutritious food for your Purrgy |
||
| Line 357: | Line 662: | ||
| style="text-align:center;" |1000 |
| style="text-align:center;" |1000 |
||
|} |
|} |
||
==Gallery== |
|||
<gallery> |
|||
Pawbury_Zone_A.png|Pawbury area A |
|||
Pawbury_Zone_B.png|Pawbury area B |
|||
</gallery> |
|||
==References== |
==References== |
||
Latest revision as of 19:46, 18 April 2024

| “ | A lovely town where old people settle down to enjoy their pension. Most famous for the Monastery of Illuginn and its many Purrgy. | ” |
| ~ Area Description
|
Pawbury is a town connecting Soggy Swamp and Wostin Desert. It is the fourth town in the game and where the player find the Monastery of Illuginn, located in the north-west area of the town.
Description
Pawbury is a town mostly populated by elderly people. There are also many Purrgy located around the town, along with statues resembling them.
On first arriving, the town is being haunted by restless spirits, causing various objects to float and be inaccessible.
Music Theme[1]
This theme is teased by the official Coromon YouTube channel on their Pawbury teaser soundtrack video. (For Mobile Users, click here)
Coromon Located Here
Grass B is found at the Cemetery
| Coromon | Level | Rarity | Area | Double Battle | Triple Battle |
|---|---|---|---|---|---|
| 16-23 | Common | B | B | ❌ | |
| 18-22 | Common | B | ❌ | ❌ | |
| 18-22 | Common | A | ❌ | ❌ | |
| 17-20 | Common | A | ❌ | ❌ | |
| 8-22 | Common | A | A | A | |
| 20-22 | Common | A | ❌ | A | |
| 18-23 | Common | B - Water | ❌ | ❌ | |
| 17-20 | Common | Water | ❌ | ❌ | |
| 19-21 | Common | Water | ❌ | ❌ | |
| 16-18 | Uncommon | A | ❌ | ❌ |
Encounter Rates
| Zone | Rates | |||||||||||
|---|---|---|---|---|---|---|---|---|---|---|---|---|
| Grass A | 20.00% |
10.00% |
30.00% |
15.00% |
25.00% |
|||||||
| Grass B | 30.00% |
20.00% |
30.00% |
20.00% |
||||||||
| Water | 20.00% |
40.00% |
40.00% | |||||||||
Rates for fruits held during battles
| Zone | Rates for fruits held during battles | |||||||||||
|---|---|---|---|---|---|---|---|---|---|---|---|---|
| Grass A | 5.00% |
20.00% |
10.00% |
6.67% |
8.00% |
|||||||
| Grass B | 6.67% |
5.00% |
0.00% |
5.00% |
||||||||
| Water | 0.00% |
7.50% |
7.50% | |||||||||
Items
| Area | Item | Location |
|---|---|---|
| Pawbury | Statue beside Trainer Hub | |
| Small rock outside Furclaw Manor near Basement entrance | ||
| Statue at south-east corner of Furclaw Manor yard (Req. | ||
| Chest beside Furclaw Manor (Req. | ||
| Silver chest at south-west of the manor entrance. | ||
| Behind large statue in front of Monastery of Illuginn | ||
| Chest behind hedges of Furclaw Manor yard (Req. | ||
| Statue at north-west corner of Furclaw Manor yard (Req. | ||
| Statue east of Monastery (Req. | ||
| Statue west of Monastery (Req. | ||
| Levitating chest near swamp | ||
| Chest beside Shop (Req. | ||
| Chest inside Sabrina's House (Req. | ||
| Golden chest inside Witch's House (Req. | ||
| Chest hidden below the trees next to the boat (Req. | ||
| Community Sculpting Center | Chest in room left side of entrance | |
| Trainer Hub | Chest in 2nd Floor | |
| Shop | Plant in the right side of entrance | |
| Furclaw Manor | Barrel in basement room | |
| Chest in basement room | ||
| Barrel beside bookshelf in Puzzle room | ||
| Glass case in Puzzle room | ||
| Chest in Puzzle room | ||
| Clock at 2nd floor hall | ||
| Oven in Kitchen | ||
| Trashcan in Kitchen | ||
| Table/Pedestal in First Floor Entrance Hall | ||
| Stepladder/Cardboard Box in 1st Floor Library | ||
| Full Male Statue Left of the Couch in 1st Floor Gallery | ||
| Full Female Statue Right of the Couch in 1st Floor Gallery | ||
| Chest in 2nd Floor Bottom Right Bedroom | ||
| Furniture in basement room, right next to a Purrgy. | ||
| Silver Chest on a table in Bottom Left Sitting Room | ||
| Gold Chest on a table in Top Right Bedroom | ||
| Gold Chest in 2nd Floor Bottom Left Sitting Room | ||
| Cemetery | Tombstone in 2nd from the left on the 2nd row | |
| Chest beside grass | ||
| Hyperloop | Plant right side of entrance |

Hidden Gems/Items location
| Location | ||
|---|---|---|
| Pawbury | ||

|
||

|
||

|
||

|
||

|
||

|
||

|
||

|
||

|
||

|
||

|
2000 | |
| Furclaw Manor BF1 | ||

|
||
| Furclaw Manor | ||

|
||

|
||
| Furclaw Manor F1 | ||

|
||

|
||

|
||
| Mason's House | ||

|
||
| Witch's House | ||

|
||
| Pawbury Hyperloop | ||

|
||
| Trainer Hub: bottom floor | ||

|
||
| Shop | ||
| There are no hidden gems/items in this map. | None | |
Shop[2]
| Image | Name | Description | |
|---|---|---|---|
| Health | |||
| HP Cake (S) | Restore 20 HP | 250 | |
| HP Cake (M) | Restore 50 HP | 700 | |
| HP Cake (L) | Restore 200 HP | 1200 | |
| Energy | |||
| SP Cake (S) | Restore 20 SP. Overcharges 5 SP if applicable | 150 | |
| SP Cake (M) | Restore 25 SP. Overcharges 10 SP if applicable | 250 | |
| SP Cake (L) | Restore 35 SP. Overcharges 15 SP if applicable | 400 | |
| Combi | |||
| Combi Cake (S) | Restore 15 HP and 15 SP. Overcharges 5 SP if applicable | 550 | |
| Combi Cake (M) | Restore 40 HP and 20 SP. Overcharges 10 SP if applicable | 1200 | |
| Combi Cake (L) | Restore 150 HP and 25 SP. Overcharges 15 SP if applicable | 2000 | |
| Battle | |||
| Attack Cake (S) | Increases Attack 1 stage for one battle | 500 | |
| Defense Cake (S) | Increases Defense 1 stage for one battle | 450 | |
| Sp. Atk. Cake (S) | Increases Sp. Attack 1 stage for one battle | 450 | |
| Sp. Def. Cake (S) | Increases Sp. Defense 1 stage for one battle | 400 | |
| Speed Cake (S) | Increases Speed 1 stage for one battle | 250 | |
| Status | |||
| Iced Cake | Cure a Coromon of its burn | 350 | |
| Lifted Cake | Cure a Coromon of its curse | 300 | |
| Spicy Cake | Thaw out a Coromon, removing freeze | 200 | |
| Clear Cake | Restore a Coromon's focus, removing its haziness | 200 | |
| Detox Cake | Remove poison from a Coromon | 300 | |
| Ground Cake | Cure a Coromon of its shock | 350 | |
| Cafi Cake | Wake up a Coromon from its sleep | 200 | |
| Revive | |||
| Phoenix Shard | Revive a Coromon and restore half of its HP | 1500 | |
| Spinners | |||
| Spinner | A device for catching Coromon | 200 | |
| Silver Spinner | A device for catching Coromon. More effective than a Spinner | 600 | |
| Golden Spinner | A device for catching Coromon. More effective than a Silver Spinner | 1200 | |
| Spooky Spinner | A Spinner designed to efficiently catch Ghost type Coromon | 500 | |
| Stones | |||
| Stinky Disc | Chance to repel wild Coromon if held by your leading squad member | 5000 | |
| Fear Disc | Can attract already hurt Coromon if held by your leading squad member. | 5000 | |
| Usables | |||
| Stinky Scent | Repels Coromon weaker than your leading squad member for 3 minutes | 600 | |
| Protein Scent | Attracts Coromon with a higher level for 3 minutes | 800 | |
| Fear Scent | Can attract a Coromon which are already hurt for 3 minutes | 1200 | |
| LuxRecall | Recall to Lux Solis campus | 500 | |
| Purrgy Nibbles | Extra nutritious food for your Purrgy | 400 | |
| Skill Flash | |||
| Skill Flash 39 | Flash the Drain skill to a Coromon | 1500 | |
| Skill Flash 48 | Flash the Concentrate skill to a Coromon | 1000 | |
| Skill Flash 60 | Flash the Last Stand skill to a Coromon | 2000 | |
| Skill Flash 65 | Flash the Scary Vision skill to a Coromon | 1000 | |
Gallery
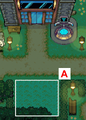
Pawbury area A
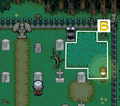
Pawbury area B


References
- ↑ https://www.youtube.com/watch?v=7fIyrlD5mNQ&t
- ↑ More standard shop items become available as you progress through the game.
Categories:
- Article stubs
- Locations